Recently, I’ve been catching up on some journal reading and came across an ergonomics article in an online plastic surgery journal that I wanted to share.
Painful body areas in the study of surgeons. Look familiar? Neck, back, and shoulders are common areas for spay neuter vets to experience pain as well.
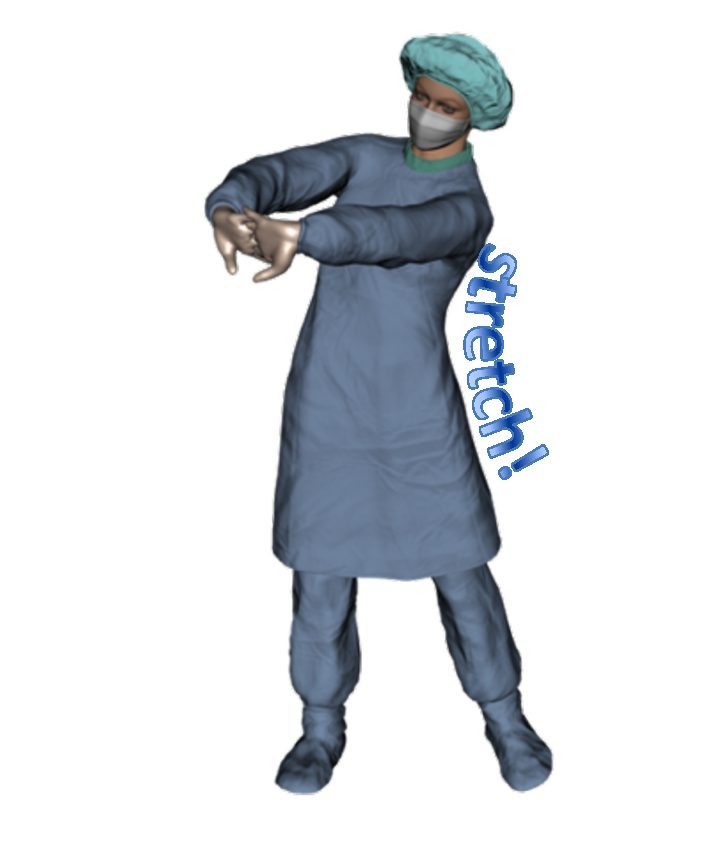
Stretches for Surgeons
What I liked about the article, though, was that it published a supplemental set of videos of one of the authors’ consultations with a physical therapist. The physical therapist offers exercises and stretches to counteract common surgical postures. The videos are available along with the article (and are slow to load, but be patient). Video 1, video 2, and video 3 are all recordings of this consultation, while the final video shows the surgeon by himself, performing each of the exercises from the consultation in the first 3 videos. The final video goes too fast for viewers to follow along while doing the exercises themselves so works better as a reference than as an accompaniment to exercise.
These videos offer something specific that I hadn’t seen before and that I have wished I could share with others: stretches and exercises targeted for surgeons. (Maybe this exists somewhere but I haven’t come across it yet). I’m curious totry some and if they help relieve some neck/shoulder/upper back tension.
It would be even more exciting if the study had actually tested the stretches and exercises to determine if the surgeons were more comfortable or more flexible after using them for a time. But they didn’t, so as it is we’re left with recommendations based off the physical therapists’ “standard practice algorithms” for addressing the surgeons’ complaints.
Limitations
The study had other limitations besides not having tested the exercises on surgeons. The study design isn’t optimal: the sample size is limited, and the authors didn’t use a validated musculoskeletal discomfort questionnaire. The participants’ surgical posture self-assessment was also problematic. After watching a 2-minute video, the participants were asked to judge deficiencies in their own surgical posture based on their ability to complete the stretches and range of motion activities in the video. They didn’t have the chance to view video of themselves at work or to have any assessment by an ergonomist or physical therapist, so I’m skeptical of that measure’s validity.
Despite the article’s shortcomings as a scientific study, I think that the exercises suggested in the videos could be a good resource or starting point for surgeons experiencing discomfort and for those trying to avoid it. Let me know if any of these work for you, or if there are any other exercises or stretches that work better.
Meanwhile
Today we had the chance to fire up the Hartland Community Oven which was built in our town during the pandemic. Tina was on the oven committee (she helped build it, too) so she has been through several firings in 2020 and 2021, but this is only my second time baking in the oven. Despite a sometimes windy, sleety afternoon, we spent a few hours out there baking different things as the oven went from really hot to only sort of hot. Everything looks and tastes great and I think I’m done cooking for the week! (well, maybe).
The need to lift dogs is common in small animal clinics. What are some ways that we can make lifting easier and less challenging on our bodies?
In the previous post we talked about some basic principles of lifting and carrying. Today we’ll expand on those ideas look at lifting large dogs.
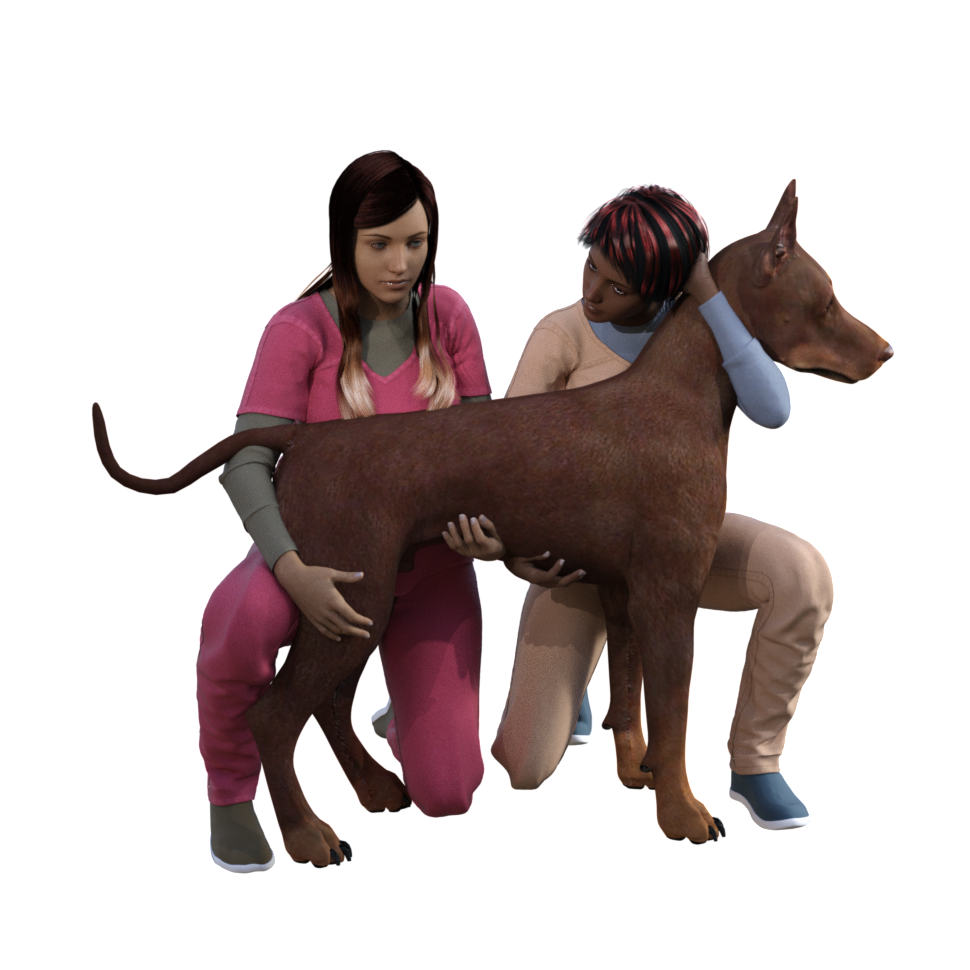
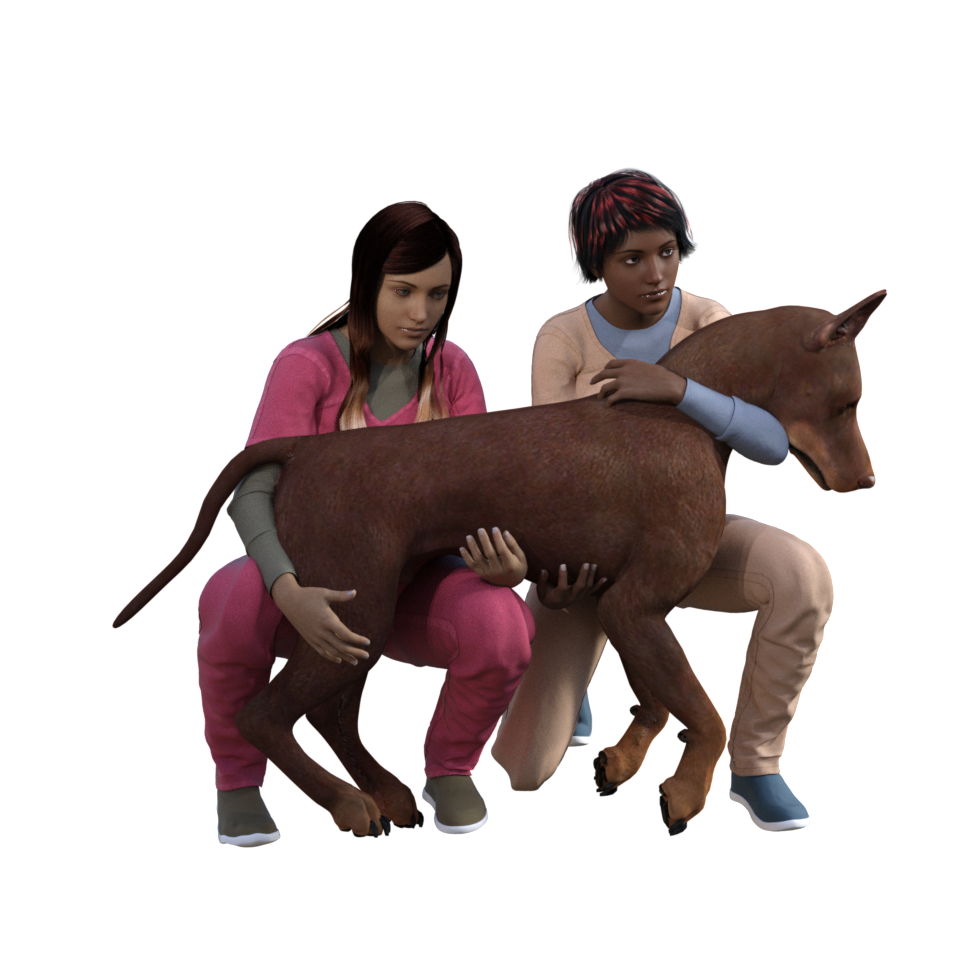
Workers restrain a standing dog. This restraint posture (one leg kneeling and the other bent) could also be used to lift this dog.
The need to lift dogs is common in any small animal clinic, especially in HQHVSN. The dogs we lift may be awake, sedated, or fully anesthetized, and each type of lift comes with its own challenge. Awake dogs may resist handling and wiggle, while anesthetized or heavily sedated dogs may be loose and floppy and difficult to grip.
What are some ways that we can make lifting easier and less challenging on our bodies?
Standing or Lying Down?
Remember that the height of the lift is a factor in the lift’s difficulty. It’s easier (ergonomically) to lift a standing dog than one who is lying down. (It may not be easier overall if the dog wiggles or resists). The standing dog’s center of mass is higher than the ground and already closer to the lifted position. This means you don’t have to lift that center of mass all the way from the floor to your waist height or to a table.
Lifting a standing dog requires less bending and less muscle effort than lifting a dog who is lying down.
Back, Hips, or Knees?
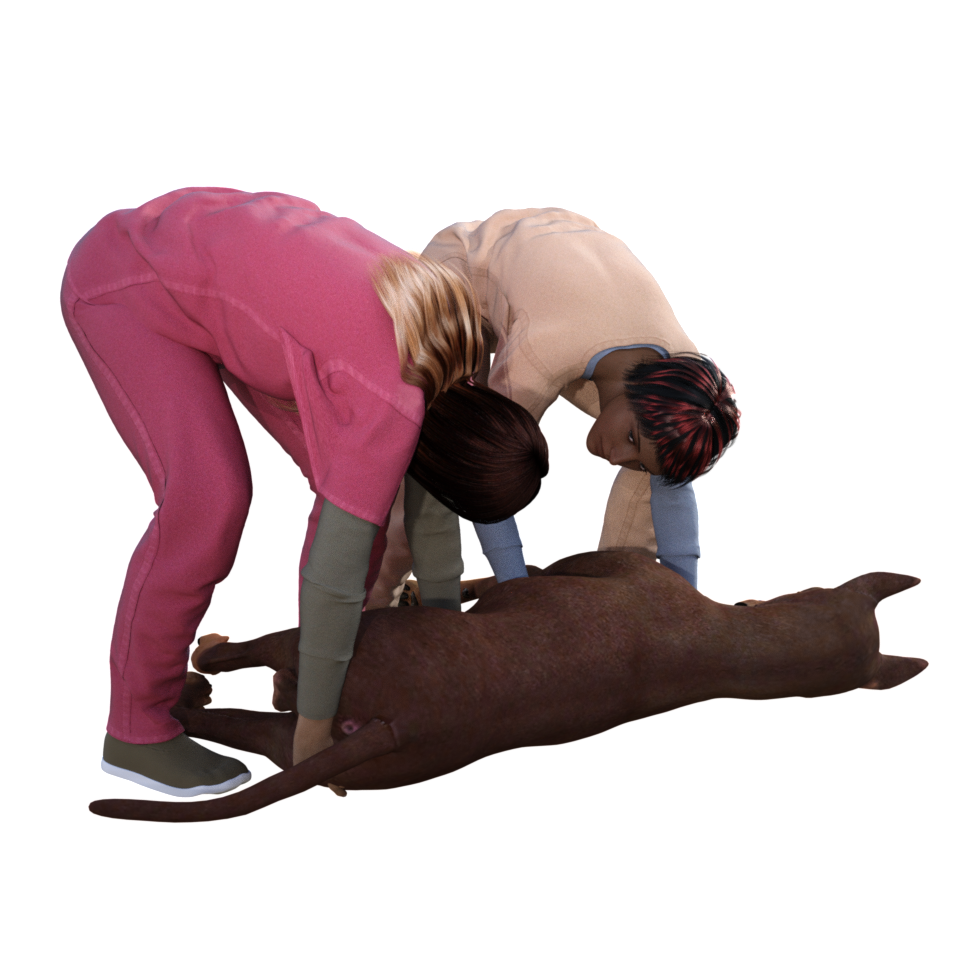
When lifting from the floor, workers may bend at the knees, hips, or back, or a combination of all three. Generally, we are told to “lift with your legs not your back.” And to some extent this is true: repeated, extreme flexion of the back puts much of the strain of the lift on the vertebral joint end plates. End plate damage may be one of the causes of chronic low back pain.
In the first picture, workers bend at the knees and hips to lift an anesthetized dog from the floor. In the second picture, workers bend at the hips with a slight knee bend and lumbar flexion.
However, the recommendation to avoid any lumbar flexion during lifting is not supported by research. It’s definitely best to avoid extreme lumbar flexion (60o or more), but it is OK to flex the back along with the hips and knees when lifting.
In the end, the best means of lifting probably involves moderate flexion of the knees, hips, and lower back. The “best” way to lift will vary depending on the specific task and the individual’s strength and pre-existing pain.
Not so good: Here the worker in magenta scrubs is bending mostly with her back rather than with her hips or knees. This lift will put unnecessary strain on her lower back. Also her hold on the dog’s stifle (knee) will not lead to a secure hold once the dog’s feet are off the ground.
Two Person Lifting
The workers are facing the same direction and will coordinate their movements through the clinic.
When lifting as a team, both team members must communicate clearly with each other. Both team members need to know where to position themselves, when to begin lifting, and where to carry the dog. For example, if a dog is to be lifted onto a table, it is important that both lifters know which way the dog should be facing on the table before they position themselves for the lift.
Use simple technology to help
Use technology for your lift! If you need to move a large sedated dog who can’t walk, consider using a stretcher or cart.
Our worker in the previous post used technology (a hand truck) to help transport a cardboard box. Likewise, we can use technology to help move our anesthetized dog. Stretchers and wheeled carts are both useful ways to turn a floppy, hard-to-grip load into a rigid load with handles.
Similarly, lowering a hydraulic table decreases the height of the lift, thereby decreasing its difficulty.
Lifting a dog from the floor to a table is hard, but lowering the table turns a 3 foot lift into an 8 inch lift and requires less effort.
Meanwhile…
I hope you all are staying safe and well. Here, spay neuter clinics go on even as we find ourselves dodging COVID and mud season simultaneously, just as we have the past two years. I feel lucky for the flexibility and adaptability of my vet techs and clinic hosts as we still manage to get those cats spayed before kitten season hits. Thanks y’all!
Let’s start with some ergonomics fundamentals: lifting and carrying. This post shares some basic concepts that we’ll be able to apply later to specific veterinary activities like lifting and carrying dogs.
This will be the first in a series of posts about ergonomics in the veterinary clinic–and everywhere else. It’s been a long pandemic, but in the past half-year I’ve had a couple of opportunities to talk about veterinary tasks aside from surgery. Today’s slushy snowstorm seems like a good time to share some of the illustrations and ideas from these presentations.
March “snowstorm” with Spaymobile in background
Lifting and Carrying: the fundamentals
Let’s start with some ergonomics fundamentals: lifting and carrying. This post shares some basic concepts that we’ll be able to apply later to specific veterinary activities like lifting and carrying dogs.
First, what are the characteristics of a lifting task that can make it more or less hazardous?
Weight of load
Distance of your hands from your lower back
Height of lift (From floor or from above knee height? How high do you need to lift?)
Twisting and side bending
Working in a restricted space
Good grip, or irregular, bulky, floppy, unpredictable load
Flooring condition (dry, clean, good condition, or wet or uneven)
Communication and coordination when lifting as a team
Carrying an object close to the body and near waist height
For our lifting and carrying example, we’ll use the ubiquitous brown cardboard box. In the first illustration, the lifter is carrying a box near her body and near waist height. This puts the object close to her center of mass and puts the least amount of strain on her body. It makes intuitive sense to us that she would carry the box this way instead of carrying it with her arms extended, far away from her body and her center of mass.
In this next set of illustrations, it looks a bit strange to carry the box with extended arms. But when the worker is carrying a larger box of the same weight, she is essentially doing just that– carrying the weight further from her center of mass and putting more strain on her back. A bulky object’s center of mass is further from the worker’s center of mass, meaning that even if this object is the same weight as the first box, it puts more strain on the worker’s back. The increased strain is due to the leverage created by the weight’s greater distance from the worker’s core.
While carrying a box far from the body looks strange, it’s the same strain as carrying a big box of the same weight.
(Want to learn more about how lifting strain increases depending on the size, shape, and weight of the object and the height of the lift? Check out the NIOSH Lifting Equation.)
Another circumstance where the worker might be holding an object far from her center of mass is when obstructions in the environment require her to do so. Removing objects that obstruct work areas (such as boxes obstructing a countertop) may seem obvious but it can also be the “low hanging fruit” when making ergonomic improvements.
In the first illustration, the worker has to extend her arms to place the object on the counter. In the second, the obstructions are removed and she can place the object without extending her arms as far.
Yet another reason for carrying a weight far from one’s body because it the load is smelly, damp, messy, or covered in some bodily fluid– but the same principles apply. If it’s a soiled but lightweight cat carrier, it makes sense to hold it at arm’s length on the way to the wash area. But if it’s a whole load of smelly laundry or a patient covered in pee, using a protective barrier (plastic bag or clean towel) and holding the weight close to the body is a better choice because it allows for a more secure hold and less strain on the lower back.
Lifting below the knees or above the shoulders adds additional strain.
Lifting or placing objects below the knees or above the shoulders also adds additional strain on the worker’s body. Low placement may put strain on knees and lower back, while high placement can strain shoulders and arms (and introduce the risk of the object falling). Heavy items that need to be lifted and carried (cases of wet food; trays of instrument packs) should be near waist level to reduce the strain of lifting them. Lightweight objects can be placed on high shelves, with the bottom shelves reserved for heavier objects that will be transported with mechanical help like a wheeled cart or items that are used less often.
A worker uses a hand truck/ a dolly/ a trolley/ a two-wheeled cart to transport a large box. (Nomenclature for this device varies a lot as you can hear in this link)
Mechanical help can be an excellent way to reduce strain when transporting objects. Gurneys, hand trucks, carts, and other devices bear the weight of the load, freeing the worker from the heavy lift.
Next time we’ll talk about the ergonomics of lifting and carrying dogs– stay tuned!
After writing this blog for a few years now, I realized that I haven’t explained what I do for my “day job” as an HQHVSN veterinarian. I am the Executive Director and Veterinarian at Spay ASAP Inc., a MASH-style spay neuter clinic in Vermont and New Hampshire.
MASH (Mobile Animal Sterilization Hospital) clinics are a type of mobile spay-neuter program in which clinic staff transport surgical equipment to a venue and set up a temporary surgical space in that location. Surgeries are not performed in the MASH vehicle, but instead utilize an existing space in the community.
American Legion in Claremont NH, a site of many of my MASH clinics.
Examples of clinic locations that I’ve used include animal shelter buildings, church basements, animal care (grooming and boarding) facilities, fire stations, town offices, school gymnasia, senior centers, and many more.
We also used to do MASH clinics in the old farmhouse that housed the offices of the Concord Merrimack County SPCA
MASH programs vary in the number of surgeons, technicians, and support staff, the frequency of surgery days, the number of consecutive days at a single venue, and in mission and organizational structure. Some MASH programs work independently of other humane organizations (independent MASH programs), while others conduct all their work in collaboration with other humane organizations (collaborative MASH programs). Over the years, Spay ASAP has been hosted by over 15 different humane organizations in Vermont and New Hampshire, and currently we are hosted by 8 different organizations and also have a few additional humane organizations that bring animals to our clinics.
Venues
When the space is small, shelving units for cat crates can optimize the available space
Venues for MASH clinics may be diverse and creative, but with few exceptions, MASH clinics require an enclosed space of a minimum of 1000 square feet (preferred 2000 square feet or greater) that can be maintained at a safe, comfortable temperature, and access to hot and cold water and electricity. In cases where running water is not available, hot and cold water may be brought to the venue. Facilities may be able to provide large nonmedical objects such as folding tables, chairs, and trash receptacles; if not, these items should be provided by the host organization.
Animal Housing
You seriously never know what cats will arrive in.
Since many MASH clinics do not take place in animal care facilities, animal housing often consists of pet carriers or folding wire cages. In these cases, host groups should be prepared to provide crates and bedding for housing dogs, as many owners will not have or will not be able to transport appropriate crates or cages for their dog. Cats and rabbits are generally housed in the carriers in which they arrive at the clinic, and community cats remain in their traps. It is wise to have additional crates available in which to house cats who arrive in inappropriate or inadequate housing.
Yes there are 3 cats in here. That is 30 pounds of black tomcats.
Dogs housed in folding wire cages provided for the day by the host shelter. The sheets over the cages give them some visual barrier between them and keep the room a little calmer and quieter.
MASH Equipment
Equipment requirements for a MASH clinic are similar to those in other clinic types, but all items must be compact and packable, and must have the durability to withstand transport, packing and unpacking daily. Choices for surgery table, surgery light, and anesthesia machines will be influenced by this need for packability and durability.
Vehicle
My first MASH vehicle, a 2006 Scion xB. It was the perfect Spaymobile: boxy with great gas mileage. Also, this picture was taken in early springtime.
For our MASH vehicle, we needed space for 2 people and the necessary equipment. A small minivan, a compact SUV, a station wagon, or a boxy passenger car are adequate for a collaborative MASH program. Small, mass-market vehicles have the advantage of low purchase price, good fuel economy, and low maintenance costs.
Our current MASH vehicle, a 2016 Kia Soul
Anesthesia Equipment
Our tabletop anesthesia machine. Currently set up with a nonrebreathing system for patients under 5 kilograms
Like many MASH clinics, we use inhalational agents (isoflurane) for some of our patients’anesthesia. We have two anesthesia machines: one for the surgical prep area and one for surgery. This allows animals in the prep area to receive oxygen and anesthetic gas while they are being clipped and scrubbed, so that when they arrive on the surgery table they are on a steady anesthetic plane for surgery.
Tec 4 vaporizer. Boxy but good.
Tabletop anesthesia machines are easy to carry and need not be disassembled to pack in a small vehicle. Our current machines were custom made by Eagle Eye Anesthesia. We use a Tec 4 type vaporizer (the big, square-bottomed heavy ones) since they contain internal baffles that limit the movement of the anesthetic agent. Basically, they continue to deliver appropriate anesthetic concentrations even if the vaporizer is temporarily tipped or upended (ie, when the machine falls out upside down onto the ground when you open the car door).
E-cylinder with oxygen
For oxygen we use portable E cylinders in 2-wheeled oxygen cylinder carts and attached to the anesthesia machine via a regulator and oxygen hose.Oxygen cylinders should be immobilized in the vehicle for transport.
For anesthetic gas scavenging, we usually use passive scavenging (unless we are in a venue with a surgical suite with active scavenging). Passive scavenging options include exhaust through a window, through a hole made in the wall, or using an activated charcoal absorbent canister such as a F/Air canister.
Anesthetic gas scavenging options: out the window, out the wall, or using a charcoal canister.
Equipment Bins
Small equipment and supply items used during the MASH surgery day are packed in bins or totes for organization and ease of transport . We sort our bins by type of items: needles and syringes in one bin, anesthesia tubing and bags in another. We have smaller bins for surgery packs that hold about a dozen packs each.
Bulky supplies are contained in large (18 gallon) bins, and surgical packs are in smaller bins. A rolling cart aids in transporting items into and out of the venue.
A rolling cart is also helpful for venues with level entrances, allowing us to make fewer trips between the car and the surgery area during setup and takedown.
Surgery Table and Light
Surgery table made from old countertop and aluminum legs, placed atop a standard table. An instrument bin to the left of the table is used as an instrument stand, and an architect’s lamp with a compact fluorescent or LED bulb is used as a surgery light.
Some MASH programs require that host organizations provide appropriate height surgery and prep tables and a surgery light at each venue. This is most easily achievable if clinic venues are used repeatedly and are owned by the host organization. In these cases, steel food service tables or appropriate-height tables constructed by volunteers offer alternatives to commercial surgery tables.
At Spay ASAP, we went with a different option and have a portable surgery tabletop, allowing for greater flexibility in temporary surgery venues. A portable tabletop may be constructed using a piece of countertop with folding legs at a fixed or adjustable height that can be placed atop a standard height table– ours was made from a piece of countertop that once went over a dishwasher. We use a small bin (a surgical instrument bin) as an instrument stand.
Surgical prep table elevated on bed risers. An ergonomic standing mat is provided for the veterinary technician.
Other portable table alternatives would include using a small or standard folding table with bed risers or an adjustable-height folding table. We also elevate the surgical prep table to the appropriate height for the veterinary technician using bed risers or blocks.
For surgical lighting, we use an architect’s lamp with a compact fluorescent bulb of 23 watts or greater, or LED bulb of 16 watts or greater (equivalent to a 100-watt incandescent bulb). Alternatively, a head lamp may be used, but I find the weight of these lamps to be uncomfortable and am less impressed by the lighting quality.
Patient warming
Selecting a surgical patient warming device for MASH can be challenging, as some are too bulky to transport in small MASH vehicles, and those containing water may be difficult to transport due to spilling or freezing water during transport and storage (I used to use a Gaymar pump and water blanket but got frustrated by leaks and spills and the risk of freezing). A low-voltage conductive polymer fabric heating pad (such as Hot Dog or ChillBuster or Warm Blood if you can still find them) can be used, as they are compact and fairly durable.
Any postoperative warming devices that we use, such as heating pads, rice socks, or electric blankets, are supplied by the host organization, and should be used with caution (ie, no skin contact with the pet, and used only with direct human supervision) to avoid thermal burns.
Additional Equipment
Net, squeeze cage, and kevlar gloves.
Additional equipment transported by the MASH clinic includes a scale to weigh surgery patients, anesthesia monitor(s) such as a pulse oximeter or capnograph, anti-fatigue floor mats, and an insulated container for vaccines.
Safety equipment such as cat net, animal handling gloves, syringe pole, squeeze cage, and dog muzzles should be included, as many venues will not have adequate handling equipment. An additional useful piece of handling equipment is a snappy snare, which is a 3- to 5-foot-long stiff leash that allows the leash to be placed on the dog from a distance, and is useful for safely applying a leash to a frightened dog in a crate or kennel.
“Home Base”
Entrance to our rented room above a veterinary clinic
MASH clinics require a small area (minimum 10 x 10 feet) for receiving and storage of supplies and medications. At Spay ASAP, we rent a room on the second floor above a veterinary hospital. The ideal space would be easy to access with a convenient geographic location, a convenient physical location (first floor, near supply delivery area), and is temperature controlled for safe medication storage. Our space isn’t ideal from the point of view of deliveries, but we do have direct access via the fire escape.
If the MASH program is part of existing organization with a physical building, the MASH clinic can use this space.
If the MASH is a new organization or has no suitable site, possible sites include the home of a staff member or a rental space. Renting space from an existing animal care organization such as a veterinary clinic offers the advantage of on-site staff to receive deliveries of temperature-sensitive items such as vaccines or medications.
Inside our storage room: just enough space for backstock and storage of the supplies that don’t fit in the vehicle
If the home base is to be used for surgical pack preparation, it should contain or allow access to laundry facilities (unless all drapes and pack wrappers are disposable) and electricity, and should be large enough to accommodate pack assembly and an autoclave. During times when we have prepared packs in our rental space, we have rented additional space in order to have table space to prepare packs.
How to set up a MASH program: organizational structure and details
Everything from here on is more nitty gritty organizational detail, including more words, no pictures, and more generalizable information. It draws heavily from the MASH textbook chapter. It may be a bit too detailed for a blog post, but I wanted to get this information out and available for anyone who is really interested in starting up this type of clinic.
Can I MASH here? Legal issues:
Before considering a MASH clinic, be certain to check any relevant state or provincial veterinary practice acts and local regulations to be sure that MASH clinics are permitted. Some states and provinces require premise permits for any practice location, which may preclude MASH clinics. However, in some cases, states or provinces that require premise permits may allow exemptions for MASH clinics if asked in advance.
Who should MASH?
MASH clinics are adaptable and there are not specific prerequisites for regional population density or shelter animal intake. They are suitable for rural areas where low population density does not easily support a stationary clinic (like the border area of Vermont and New Hampshire), as well as for densely populated urban areas. MASH clinics are valuable for local shelters that wish to provide in-house HQHVSN, but either cannot afford to build and equip their own surgical suites, or that have surgical areas but lack veterinary staff. MASH clinics are also suitable for international and remote area spay-neuter programs.
For a veterinarian with surgery skills seeking spay-neuter work, establishing a MASH clinic can be one of the fastest and lowest cost ways of starting a HQHVSN clinic. This is what I did when I started Spay ASAP in 2006, and we went from registering the nonprofit in March to performing our first surgery in early June. In most cases, veterinarians who choose this route should be willing to operate the business aspects of the clinic and be able and willing to work with shelters and humane organizations in their target region.
In some cases, programs with limited startup funds may wish to offer surgery services before fundraising is complete or before a clinic site is located for a future stationary clinic. In this case, a MASH clinic may serve as a temporary economical option during the development of the HQHVSN program. Since any equipment purchased for MASH can be used in other models, the MASH clinic provides the opportunity for quicker startup without loss of equipment investment.While MASH programs are diverse, this chapter will focus on programs that utilize paid veterinarian(s) and technician(s) and operate within a prescribed region (as opposed to national or international scope). However, many of the descriptions in this chapter may be adapted to MASH programs that operate internationally and/or use volunteer veterinarians and technicians. For information on setting up international or remote area MASH clinics, the reader is referred to Susan Monger’s chapter on Operating a field Spay Neuter Clinic in the Field Manual for Small Animal Medicine.
Independent versus Collaborative MASH programs
MASH programs can operate their clinics independently of other humane organizations in a region or may collaboratewith other humane or community organizations to host their clinics. Some MASH clinics may use a combination of these two approaches. There are advantages and disadvantages to each of these models. My own Spay ASAP clinics are collaborative MASH clinics so I’m biased towards that model and find it to be sustainable over the long term.
Collaborative MASH programs
CollaborativeMASH programs are generally small organizations that collaborate with various local humane or community groups that act as their hosts in the communities within their service area. These host groups (or “ground teams”) must provide the venue and personnel, consisting of 2-5 staff members or volunteers, while the MASH program (or “surgery team”) provides the veterinarian, the technician, and all surgical supplies and equipment. The host organization is responsible for scheduling, admitting, and discharging patients, and for printing, preparing, and distributing clinic paperwork such as medical record forms, liability releases, discharge instructions, rabies certificates, and neuter certificates. Host groups are often required to provide non-medical supplies such as tables, chairs, animal bedding, extra pet carriers, and trash receptacles. In these collaborative programs, the MASH group generally works with several different host organizations throughout their service area to host clinic days. At times, more than one local humane group may work together to host a MASH clinic.
Collaborative MASH programs empower small humane organizations and shelters to host their own “Spay Days,” affording them the opportunity to enhance their community relations and outreach. The opportunity to host and assist with a MASH clinic enables staff and volunteers at host shelters to do something “fun” and different, compared to their usual shelter duties. These collaborations also allow opportunities for MASH clinic staff to share information and best practices for shelter medicine and HQHVSN with their host organizations.
Generally, it is the responsibility of the MASH organization to provide training and mentorship to new or potential new host organizations. Before hosting their first clinic, host organizations will need to know how to schedule the appropriate surgical load and how to determine the number and skill level of volunteers required. They need to understand the paperwork and be able to provide appropriate pre- and post-operative instructions to clients. An in-person meeting between the MASH organization and potential new hosts along with written instructions on hosting protocols and expectations is recommended prior to the first clinic.
Once a MASH organization has established relationships and carried out clinics with one or more host organizations, potential new host organizations can benefit greatly by visiting with and observing existing host organizations during MASH clinic days. This peer-to-peer mentorship helps new host organizations develop their own protocols and systems and allows them to see clinic flow and ask questions before their first clinic. In some cases, this mentorship may even continue, with representatives from existing host organizations attending the first few clinics sponsored by new host organizations, smoothing their transition into their role as host.
Advantages of the collaborative MASH model include flexibility and decreased operating costs. Staffing costs are decreased for the MASH organization because of the symbiotic relationship between the MASH organization and their hosts. The MASH organization pays only one veterinarian and one technician per day, in addition to an after-hours surgical pack preparation staff, and relies upon the host organization to provide additional resources (2-5 staff or volunteers, and venue). The hosts are motivated to provide this because they need the MASH program’s staff, equipment, and expertise in order to offer affordable HQHVSN clinics.
In contrast to an independent MASH clinic, the collaborative MASH clinic requires a relatively small vehicle given the small staff and minimal equipment required. Purchasing a smaller vehicle results in a lower initial purchase price, as well as lower ongoing fuel and maintenance costs. This decreased operating cost often means that a collaborative MASH clinic is able meet their budget entirely via low-cost fees for service, without additional fundraising.
Independent MASH programs
IndependentMASH programs have sole responsibility for scheduling the venue, booking patients, securing volunteers and staff, and admitting and discharging patients. The independent MASH model is more likely to be adopted by large, pre-existing organizations, by new HQHVSN programs planning to transition to stationary clinics in the future, or by organizations doing MASH clinics intermittently. This is because developing and training the network of collaborating host organizations that is required for a collaborative MASH clinic takes time and effort. For large, established organizations that have the resources to perform ground team tasks in addition to surgical team tasks, this extra task of collaborator development may be unnecessary. For MASH clinics that operate intermittently, the collaborative relationships may languish and be harder to maintain.
In an independent MASH clinic, staffing and finances are likely to be similar to a stationary clinic or self-contained mobile surgery unit, unless adequate, reliable volunteer staffing is available. Minimal required staff would consist of a veterinarian, a veterinary technician, one or more veterinary assistants, and administrative staff for record keeping, patient booking and reception.
Independent MASH clinics may require larger vehicles than collaborative programs to transport staff, surgical equipment, and some nonmedical items such as animal bedding and extra pet carriers or crates. Since the staffing for this model of clinic is similar to that of a stationary clinic, the costs are higher as well, making this model harder to sustain financially than collaborative MASH clinics. However, independence can offer the advantage of more predictability by utilizing more consistent clinic staff and by not needing to rely on other humane groups to schedule clinic dates and locate suitable staff and volunteers.
Organizational structure
MASH clinics may be established within any organizational structure, including nonprofit, for profit, and government or tribal entities. In some cases, MASH clinics may represent a single program within a large, diverse existing organization. For example, an animal shelter with an in-house spay-neuter clinic may develop a MASH program to reach certain communities in their service area. In others, a new organization is formed for the purpose of offering MASH clinics, and this organization exists solely for the purpose of offering MASH clinics.
Financial investments and ongoing costs
Financial requirements for a MASH clinic are generally much lower than for a stationary clinic or self-contained mobile unit. There will also be some differences in the initial investments between MASH clinics following a collaborative model versus an independent model. In all MASH clinics, the major initial costs will include acquisition of a vehicle, surgical and anesthetic equipment, initial consumable supplies (for example, drugs, vaccines, syringes and needles, gauze sponges, antiseptics, and suture material) and an autoclave. In cases in which the MASH clinic already has access to a suitable vehicle, or if the MASH vehicle is purchased with a car loan, the initial investment to start a collaborative MASH clinic will likely range from $20,000- $35,000.
Ongoing costs for MASH will include personnel costs (salaries, wages, benefits, payroll taxes, workers compensation), consumable supplies, and vehicle gas and maintenance. Most MASH clinics will also need to rent a small, climate-controlled “home base” physical space for safe storage of consumable supplies (see “home base” section above).
Because overhead costs are low, it is possible to sustain a collaborative MASH clinic with low-cost fees for services, without additional fundraising. In cases where extremely discounted or free surgeries are to be offered, additional fundraising and grant writing by the MASH clinic or by one or more host organizations will be required to subsidize program costs.
Personnel
Minimal personnel requirements for a collaborative MASH clinic generally consist of one veterinarian and one veterinary technician. Some MASH programs employ additional staff for instrument care or for management. In many collaborative MASH programs, the veterinarian and technician handle instrument care and management responsibilities without additional staff. For example, the veterinarian serves as the program director/manager, and the technician assumes the responsibility for preparing surgical packs.
Independent MASH programs require additional personnel including veterinary assistants and administrative staff. The staffing model for these clinics is similar to that for a stationary or mobile self-contained clinic.
Surgical capacity
Surgical capacity for a MASH clinic should be comparable to other HQHVSN models, although in many MASH clinics, only one surgery table is available, so surgical flow and resulting speed is somewhat slower than in a fully-equipped stationary clinic. However, unlike in some self-contained mobile units, physical space for animal housing need not be a limitation for MASH clinics. Approximately 5 hours of surgery time is a full day for a MASH clinic, and this may consist of as few as 15-20 dogs or as many as 50-60 cats for one veterinarian depending on surgical speed and species and sex composition of the patient load.
Timeline
Startup time for a MASH program can vary. In the case of collaborative MASH programs, startup may be delayed if collaborating organizations need to be identified and persuaded. However, if collaborating organizations are prepared to host clinics immediately, a MASH program can start up in less than 3 months once finances are obtained.
Protocols
As with all HQHVSN clinics, MASH clinics should adhere to the ASV Guidelines for Spay-Neuter Programs. Surgery techniques, patient selection, and disinfection and sterilization of equipment are no different than in other HQHVSN clinics. Anesthesia and analgesia protocols are similar to those in stationary clinics, although care must be taken to select protocols that are suitable for same-day discharge of patients. As with all clinic types, proper medical record-keeping is essential, and clients must be provided with written and verbal postoperative instructions.
Post-operative care
As with other clinic types, there is a need to develop a postoperative care plan for emergencies and client questions. In most cases, this is achieved by providing a phone number to clients to contact MASH clinic staff in case of questions or emergencies. This phone may be carried by a veterinarian or a technician who can answer client questions and concerns and triage cases requiring veterinary care. For independent MASH clinics, administrative staff may carry this phone, triage calls, and refer medical questions to a veterinarian. Emergencies and rechecks will generally need to be seen by outside veterinary hospitals, as the MASH staff may be distant from the animal in question and may have no available facility in which to see patient rechecks. It is up to the MASH program to set policies with regards to client reimbursement or payment to outside veterinary hospitals seeing MASH clients. In many MASH clinics, as with other HQHVSN clinics, outside care is reimbursed if related to the surgical or anesthetic procedure, and if the client has generally followed post-operative instructions.
Some MASH programs have established relationships with specific local veterinarians or emergency clinics within their service areas who are willing to provide emergency care, and in some cases, the clients may be provided with this contact information instead of or in addition to contact information for the MASH clinic. Other MASH programs establish relationships with local practices as needed, as the geographical areas covered by some MASH programs are large enough that specific local relationships may be difficult to establish. Regardless, it is essential that the MASH clinic have a plan in place for how they will address follow-up or emergency care for their patients.
Surgical Instruments and their Care
In most cases, MASH clinics have no on-site autoclave. Most surgical instrument care, including ultrasonic cleaning, pack preparation and autoclaving, takes place after hours or between clinic dates. Thus, many small, collaborative MASH clinics maintain enough sterile surgical packs for multiple (2-3) days-worth of surgery or schedule time in between surgery days to provide time for packing and sterilization. This may be especially important if the pack preparation is performed by staff who are also members of the traveling MASH clinic team.
Surgical instruments should be soaked to remove organic debris and cleaned by hand by volunteers at the surgical venue, then rinsed and returned to the transport vehicle to be transported back to the home base with the surgical team. Further instrument cleaning, laundering of drapes and pack wrappers, pack preparation, and sterilization may occur at the MASH clinic’s home base, or alternatively may take place in a staff member’s home. This at-home pack preparation and autoclaving may be advantageous if the staff member lives far from the home base, or if the staff member has household obligations (such as small children) that make after-hours travel to the home base difficult.
MASH: The Day of Surgery
MASH clinics are typically located in different venues with a different layout each day. Collaborative MASH clinics work with different assistant staff each day, as provided by the host organization. These changes can affect clinic flow and efficiency, and they require the MASH veterinarian and technician to adapt to a variety of new situations and circumstances.
Setting up the clinic
In a collaborative MASH clinic, the host organization’s staff admits patients before the veterinarian and technician arrive, or while the veterinarian and technician are unpacking and setting up. In each new clinic venue, the MASH veterinarian and technician must plan the layout and flow for the clinic. The veterinarian’s and technician’s workspaces are re-created as consistently as possible but must be adjusted to accommodate the locations of windows, electrical outlets, and doors. Flow through the clinic should be optimized, although not every venue will lend itself to smooth flow between preop, prep, surgery, recovery, and postop areas.
Clinic Flow
Clinic flow in a MASH program may be somewhat slower than flow in a stationary clinic. Typically, a MASH clinic has one surgery table per surgeon, such that the surgeon must wait while patients are exchanged on the table. To improve flow while working on cats, the surgeon may alternate male and female cats, castrating male cats on a side-table or countertop while female cats are exchanged on the surgery table. MASH clinics also usually have only one prep station, which may be the rate-limiting step during fast surgeries. Also, since clinic layout and staffing vary between locations, ideal flow may not be achievable at each clinic site.
Clinic Day
The MASH clinic day includes travel, setup, and re-packing, in addition to the usual tasks related to operating a HQHVSN clinic such as performing patient exams, anesthetic procedures, and surgery. The total day length for the veterinarian and technician may be 11 hours, whereas the surgery time is only 4-5 hours. Thus, more than half the staff’s time is spent driving, setting up, and re-packing the surgery area. This time budget may be improved somewhat by changing clinic policies: driving time may be reduced by restricting the travel radius, and setup and takedown time may be reduced if the clinic is located in the same venue for multiple days.
The time required for these additional tasks of driving, setup, and packing means that MASH clinics are not the most efficient clinic model in regards to use of the veterinarian’s and technician’s professional time. A MASH that employs only one veterinarian and one technician may be operating “full time” (36-40 hours a week) with just 3 clinics—or about 100 surgeries—per week, if the technician is also preparing packs between surgery days, and the veterinarian is acting as administrator and business manager. However, despite achieving fewer surgeries per full-time veterinarian, the lower overhead costs mean that the cost-per-surgery is equivalent to that of a stationary clinic. This allows MASH clinics to pay hourly wages to the veterinarian and technician that are on a par with, or in some cases greater than, stationary or self-contained mobile HQHVSN clinics.
MASH clinics provide a flexible, low-cost, high-quality method for delivering spay-neuter services. The MASH clinic’s versatility, adaptability, relatively low capital investment, and short time to start up are the particular strengths of this clinic type, and makes these clinics useful both as short-term solutions as well as long-term, sustainable HQHVSN providers.
I hope you all enjoyed this intro to MASH clinics!
For the spay-neuter vet, pandemic social distancing has been a slow time. I’ve had plenty of opportunity to stay home sleeping, baking, playing Pokemon Go and watching birds (often these two are simultaneous activities), eating fiddleheads, and seeing spring unfurl. With services starting to reopen, I’m getting ready to go back to work on Monday, so my thoughts have started to turn back to surgery and ergonomics.
During these idle months I’ve had some time to look through old ergonomics articles and projects with an eye to assembling them into something useful. This week I found myself thinking about needle holder grasps (after a Facebook conversation) and thought to look back at my masters thesis in ergonomics. The topic was a comparison between palm grasp and tripod (fingers in the rings) grasp for needle holders. The aim was to compare users of the two techniques both by surveying them about pain and by measuring the muscular strain in their forearms. In keeping with my desire to share incidental and independent research results, I’m publishing the thesis at the bottom of this blog post (never fear, we were limited to 5000 words).
If you thought this article would answer the question of whether palm grasp is better than placing fingers in the rings of the instrument, think again! The utter messiness of the results and the difficulty of drawing conclusions about the different grasp types was why I never published it anywhere (until now! here!). But I learned a lot from the research about individual variability and the diversity of supposedly standardized techniques. This paragraph taken from the Discussion sums up what I learned:
The amount of grasp diversity between participants, the use of non-standard instrument grasps, and the variability in individual participants’ grasps, were surprising findings in the current study. Participants were often unaware of the grasp that they used. Several described themselves using a grasp different from the one that they actually used, and some noticed in the midst of the experiment that they were using a different grasp from what they had described. Even within a single grasp type, the participants varied in their movement patterns and degrees of forearm rotation and wrist angulation.
So while I can’t promise any groundbreaking information about which grasp style is ergonomically superior, I do think there are some interesting photos and tidbits in this article. I also think that the diversity of successful techniques leaves clear opportunity for individuals to modify their grasping and suturing technique if and when it becomes painful or problematic for them.
I hope you all are well, and staying safe. Enjoy!
Electromyographic analysis of needle-holder grasps used while suturing
A thesis in partial fulfillment of Masters of Science in Health Ergonomics, University of Derby, February, 2015
Abstract
The current study examined variations in muscular force and muscle use patterns between surgeons using different grasps while suturing. Fourteen (4 male, 10 female) right-handed veterinarians were recruited into one of two groups, palm or tripod, depending on their usual, preferred needle holder grasp. Participants completed the Cornell Musculoskeletal Discomfort Questionnaire (CMDQ) and the Cornell Hand Discomfort Questionnaire (CHDQ), and then performed a suturing task using their preferred grasp. Four muscles in the right forearm region were selected for electromyographic (EMG) recording: extensor digitorum communis (EDC), flexor carpi radialis (FCR), flexor carpi ulnaris (FCU) and abductor pollicis longus/ extensor pollicis brevis (APL).
The 1-week period prevalence of MSD was 92.9%, with 13 of 14 participants reporting pain. Of these, 7 (50%) reported hand pain, and 12 (85.7%) reported body pain. Observed grasps differed from those reported by participants, with five using exclusively tripod grasp with the thumb and ring finger in the instrument rings, two using a modified tripod grasp with thumb and middle finger, three using palm grasp for suture placement and tripod grasp during needle extraction and knot tying, three using palm grasp with no fingers in the instrument rings, and one using palm grasp with the ring finger in one instrument ring. The static load (10th% APDF) on each of the four muscles ranged from 0.9 to 10% MVC, with greater mean values for the extensor EDC than for the flexors FCR and FCU. Degrees of forearm pronation and supination ranged from 80 to 180 degrees, and degree of rotation was positively correlated with the total pain score. Future investigation into the characteristics and benefits of various grasps is warranted, so that practical advice on reducing strain and MSD risk can be offered to surgeons.
Introduction
High-volume spay-neuter is a growing practice area in veterinary medicine in the US (Looney et al., 2008) in which veterinarians may perform over 30 surgical procedures daily, and some individuals spend over 35 hours each week performing surgery (White, 2013). These procedures are of limited variety compared with general surgery, and frequently involve static postures and repetitive manual tasks. Repetitive work is associated with increases in upper limb discomfort, tendinitis, and carpal tunnel syndrome in people who engage in manual work (Latko et al., 1999), and static postures, or isometric positions where little movement takes place, multiply the risk for musculoskeletal disorders attributable to those postures (Esser et al., 2007). While work in high volume spay-neuter has many qualities that would appear to put veterinarians at risk for MSD, there is limited research on the effects of this repetitive surgical workload on veterinarians, and no research exploring ways to mitigate these effects.
A single cross-sectional study (White, 2013) has investigated musculoskeletal discomfort (MSD) in veterinarians working in high-volume spay-neuter. The one-month period prevalence of MSD was 99.1%, with 76.7% experiencing hand or wrist pain and 98.2% experiencing body pain. Hand discomfort was most commonly reported in the right thumb and/or thumb base (49.8%) and the right wrist (37.9%). This rate of hand/wrist discomfort is 1.5 to 2 times the prevalence of upper limb MSD experienced by veterinarians in general practice (Kozak et al., 2014; Scuffham et al., 2010; Smith et al., 2009), and greater than the prevalence in surgeons in human surgical practice (Adams et al., 2013; Soueid et al., 2010). Body discomfort in spay-neuter veterinarians was most commonly reported in the lower back (76.7%), shoulders (72.6%), and neck (71.7%). Three-quarters of veterinarians experiencing hand, finger, and thumb MSD attributed their MSD completely to their work in spay-neuter. Increasing career length, increasing weekly hours in surgery and decreasing job satisfaction were the work-related factors with the greatest relative contribution accounting for variation in hand pain severity and total pain. While 94.4% of respondents felt that posture and positioning during surgery is important, only 30.6% had received any instruction in posture, positioning, or ergonomics in surgery (White, 2013).
The high prevalence of upper limb MSD in spay-neuter veterinarians may be related to the high volume and limited variety of surgical tasks undertaken, and thus the repetition of a limited diversity of hand movement patterns performed in the workday. Anecdotally, some spay-neuter veterinarians have attributed their lack of upper limb MSD to their use of a palm grasp when using needle holders, instead placing their fingers in the instrument rings.
Textbooks and authors vary in their use of terms to describe instrument grip. Anderson and Romfh (1980) describe the “palmed grip” in which the surgeon grips a long needle holder by the shanks, away from the finger rings and ratchet, making it impossible to open or close the ratchet while using this grip. This is in contrast to Seki’s (1988) diagram of “grip 2,” in which the finger rings and ratchet are held in the palm of the hand, allowing operation of the ratchet mechanism. This is the same as the “modified thenar eminence grip” described by Toombs and Bauer (1993), and also described (though unnamed), two decades earlier (Weiss, 1973). More recent sources (Kirpensteijn & Klein, 2006; Yoon & Mann, 2011) name this same grasp the “palm grip.” Yoon and Mann (2011) use the term “thenar eminence grip” to describe a grasp in which the needle holder is grasped in the palm, with the tip of the ring finger placed through one finger ring. The same grasp is elsewhere called the “thenar grip” (Anderson & Romfh, 1980). Booth (2013) repeats the descriptions and terms used by Anderson and Romfh (1980), except that, in the illustration of Booth’s “thenar grip,” the fourth finger does not enter the finger ring, making this “thenar grip” resemble the “palm grip” described above.
Current consensus appears to favor “palm grip” to describe the grasp in which the finger rings and ratchet are held in the palm, with no fingers in the finger rings. The comparison grip, utilizing thumb and ring finger in the instrument rings, has been called the three point grip (Kirpensteijn & Klein, 2006), the thumb-ring finger grip (Anderson & Romfh, 1980), the thumb-third finger grip (Toombs & Bauer, 1993) [this grip is pictured with the fourth phalanx in the instrument ring, despite the use of “third finger” in the name], and thumb-ring finger (tripod) grip (Booth, 2013). For the current study, the term “tripod grip” has been chosen for its brevity and clarity.
The research comparing the attributes, physics, and precision of these grasps during open (non-laparoscopic) surgery is limited. One study found greater suturing precision among surgeons using palm grasp as compared to tripod grasp (Seki, 1988), and the author speculated that the palm grasp was more stable and reduced the difference in angle between the hand and the instrument. Despite the limited research comparing the grasps, surgical textbooks make assertions about their qualities and disadvantages. Toombs and Bauer (1993) state that the modified thenar eminence (palm) grip results in imprecise release of the needle, making this grip poorly suited to delicate suturing compared to the thumb-third finger (tripod) grip. This contrasts with Seki’s (1988) finding of greater accuracy when using the palm grip.
Several studies have used electromyography (EMG) to compare the ergonomic aspects of various grasps. Surface EMG uses electrodes on the skin to detect the electrical activity produced by the summed motor unit action potentials in the muscle of interest (Criswell, 2011). EMG signal strength has an approximately linear relationship with muscular force, making it useful in ergonomics for determining the amount of individual muscle involvement in a given task, and allowing evaluation of strain on the tissues (Hägg et al., 2004). One study comparing two different grasp styles on a laparoscopic instrument found differences in EMG amplitude in several forearm muscle groups, leading to the recommendation of a specific, palm-grasp style in certain circumstances (Berguer et al., 1999). A second study comparing various laparoscopic handle designs found that the pattern of EMG activity—the proportional use of each measured muscle—is characteristic of the handle (and thus the grasp) used, rather than being task-specific (Matern et al., 2004). A similar EMG study of handwriting grasp styles also showed characteristic EMG activation patterns for each grasp style (de Almeida et al., 2013).
The amplitude probability distribution function (APDF) is a means of EMG data reduction that is used to characterize the muscular load profile over a period of time (Hägg et al., 2004). The calculation reveals the cumulative probability for EMG amplitude over time, and can be normalized for each subject to a percentage of their maximum voluntary contraction (%MVC) for that muscle. APDF levels are often reported as 10th, 50th, and 90th percentiles, with 10th %APDF representing static load, 50th% APDF median load, and 90th% APDF considered peak load for that muscle (Szeto et al., 2009).
The current study aimed to examine variations in muscular force and muscle use patterns between surgeons using a palm grasp versus a tripod grasp while suturing. It was expected that the results could be used to guide surgeons in selecting which grasp to use routinely, and indicate which grasp to choose or avoid to decrease strain on specific muscles and their associated tendons and ligaments.
Methods
Participants
A total of 14 (4 male, 10 female) veterinarians were recruited for the present study. Participants were recruited into one of two groups, palm or tripod, depending on their usual, preferred needle holder grasp pattern. All subjects were right-handed.
Participants were recruited at two veterinary conferences: the North American Spay/Neuter Conference in Austin, Texas and the Silicon Valley Spay & Neuter Symposium in Milpitas, California, in 2014. Two additional veterinarians were recruited at a spay/neuter strategy meeting in Burlington, Vermont. Consent to participate was obtained from each participant before the study began. The study was approved by the Psychology Research Ethics Committee at the University of Derby
All participants in the study were asked to complete a questionnaire prior to participation. Demographic data including year of birth, year of graduation from veterinary school, whether they have obtained any specialty certification, and current hours per week performing surgery were recorded. Participants were shown pictures of “palm” and “tripod” grasps, and asked which grasp they use, or, if a mixture of grasps, in what proportion they use those grasps. They were also asked when they began using their current instrument grasp, whether they have used a different grasp at any point in their career, and why they have chosen their current instrument grasp.
Four muscles in the right forearm region were selected for the electro- myography (EMG) study: extensor digitorum communis (EDC), flexor carpi radialis (FCR), flexor carpi ulnaris (FCU) and abductor pollicis longus/ extensor pollicis brevis (APL). The I-330-C2+ system (J&J Engineering, Inc., Poulsboro, WA) was used to capture the surface EMG data, with a bandwidth of 10-400 Hz and a common mode rejection ratio of 100 dB, with input impedance 10 GW and a notch filter of 60 Hz. The EMG signals underwent a 16 bit analogue to digital (A/D) conversion at a sampling frequency of 1024 Hz.
Bipolar Ag-AgCl surface electrodes (Norotrode 20, Myotronics, Inc, Kent, WA) with an inter-electrode spacing of 22 mm were used. The ground electrode was an 1 3/8 inch Ag-AgCl electrode (SilveRest, Vermed, Bellows Falls, VT) that was placed on the right upper arm above the elbow.
The locations for EMG electrodes were adopted from Perotto (2011) and Criswell (2011). Before attaching electrodes, the skin was prepared by abrading with a gauze sponge. After electrode placement, the skin impedance was checked using the impedance testing function in the I-330-C2+, and impedance below 900 KW was considered acceptable.
Prior to starting the experiment, subjects were asked to perform two trials of resisted isometric maximum voluntary contractions (MVC) of 5 seconds each against manual resistance for each muscle.
Video Recording
Each session was recorded using 1080p HD video at 30 frames per second using an iPhone 5S (Apple, Inc, Cupertino, CA). A single, front view recording of each participant was made, and markers in the EMG recording allowed synchronization of video and EMG recordings.
Video recordings were used to examine posture during surgery using Rapid Upper Limb Assessment (McAtamney & Corlett, 1993). RULA assessment was made at the time in the work cycle when the highest loads occurred, assessing the participant’s dominant arm, and applied just to the experimental condition (not extrapolated to a “typical” work day).
Protocol
Each participant stood at a table adjusted to their preferred height. Participants were then asked to use an 5.5 inch Olsen-Hegar needle holder (Spectrum Surgical, Stow, OH) and thumb forceps to place five simple interrupted sutures in a polyvinyl alcohol synthetic chamois skin model using 3-0 Monocryl suture on a 40 mm, ½ circle taper needle. Measurements taken during the first suture were not included in the analysis, in order to allow the surgeon to become familiar with the materials and task.
Data Processing and Analysis
The USE3 Physiolab (J&J Engineering, Inc., Poulsboro, WA) software was used to process the EMG data. Data processing involved full-wave rectification and smoothing with root-mean-square (RMS) with a 250 ms window. These data were then exported to Microsoft Excel to compute the MVCs for each muscle, and to SPSS to compute the 10th%, 50th% and 90th% levels of Amplitude Probability Distribution Function (APDF) for the four muscle groups.
Pain severity for each body region was calculated for each participant using the scoring guidelines accompanying the CMDQ and CMHQ (Hedge, n.d.). Frequency scores were assigned: never = 0; 1–2 times a week = 1.5; 3-4 times a week = 3.5; every day = 5; several times a day = 10. Discomfort scores were assigned: slightly uncomfortable = 1; moderately uncomfortable = 2; very uncomfortable = 3. Daily interference scores were assigned: not at all = 1; slightly interfered = 2; substantially interfered = 3. Pain severity was obtained by multiplying the frequency, discomfort, and interference scores for each body part. Total body pain severity for an individual was obtained by summing all the body pain severity scores for that individual. Total hand pain scores were obtained by summing the hand pain severity scores for that individual. Total overall pain scores were obtained by summing the hand pain and body pain scores for that participant.
Demographic, MSD, and EMG data were entered into SPSS. Pearson correlations were used to assess relationships between MSD and demographic and postural characteristics. APDF levels of different muscles were compared using paired sample t-tests.
Results
Demographics
A total of 14 veterinarians participated in this study, including 10 (71.4%) females and 4 (28.6%) males (Table 1). The median age of participants was 43 years, with a range of 31 to 62 years of age. Median time since graduation from veterinary school was 13.5 years, with a range of 4 to 32 years. None of the veterinarians had obtained board specialty certification. Participants spent a median of 17.5 hours a week in surgery, with a range from 0 to 35 hours weekly. Two participants did not regularly perform surgery in their current jobs: one was in a management position and performed surgery on an as-needed basis, and the other was seeking employment. Both of these veterinarians had several years experience performing surgery.
Table 1. Participant demographic, workload, instrument grip, and discomfort data
Musculoskeletal Discomfort Prevalence
The self-reported 1-week period prevalence of MSD was 92.9%, with 13 of 14 participants reporting pain. Of these, 7 (50%) reported hand pain, and 12 (85.7%) reported body pain. All who reported discomfort also reported that it interfered at least slightly with their ability to work. In the right hand, the most commonly reported areas of MSD were the distal thumb (first proximal and distal phalangeal area; 28.6%), and the thumb base (first metacarpal area; 28.6%). MSD was reported in some portion of the right thumb [phalangeal and metacarpal areas] by 42.8% of participants. Body MSD was most commonly reported in the lower back (71.4%), right shoulder (50%), and neck (50%).
Pain severity was not correlated with age (r (12)= 0.233, p= 0.424) or hours per week in surgery (r (12)= 0.005, p= 0.987), and was unrelated to the sex of the participant (t(12) = -1.415, p=0.182).
Grasp Characteristics
Eight of the participants reported using tripod grasp all or most of the time, and 5 reported using palm grasp all or most of the time. The remaining surgeon reported using the two grasps equally. Eleven participants (78.6%) reported having adopted their current grasp in veterinary school or before, whereas 3 participants (21.4%) reported to have modified their grasp after graduation from school.
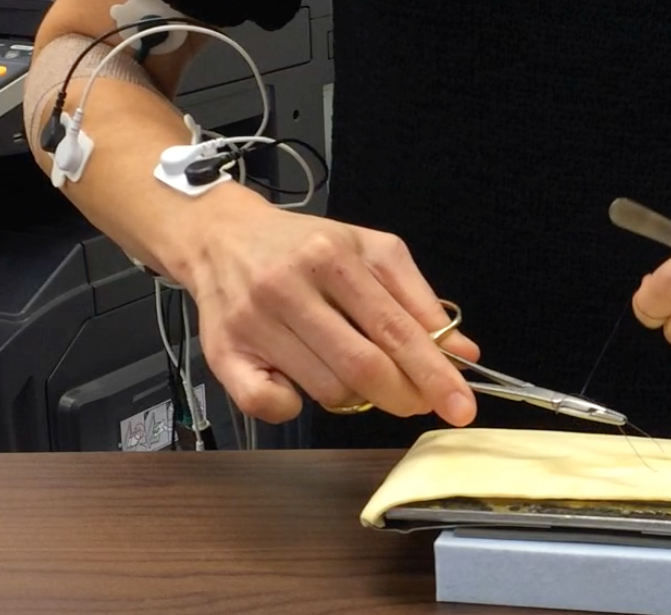
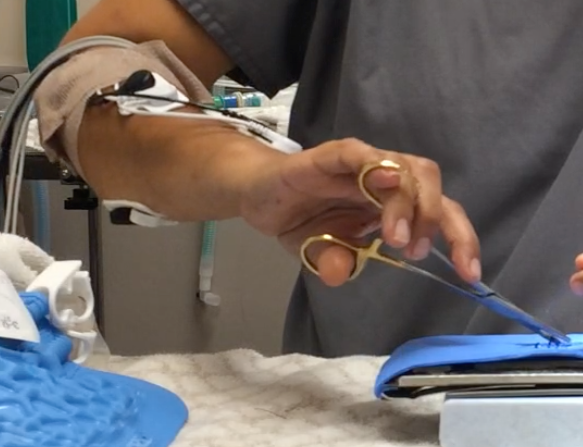
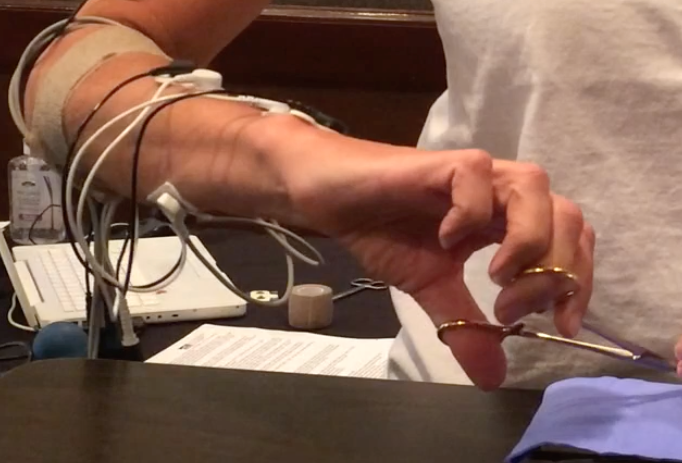
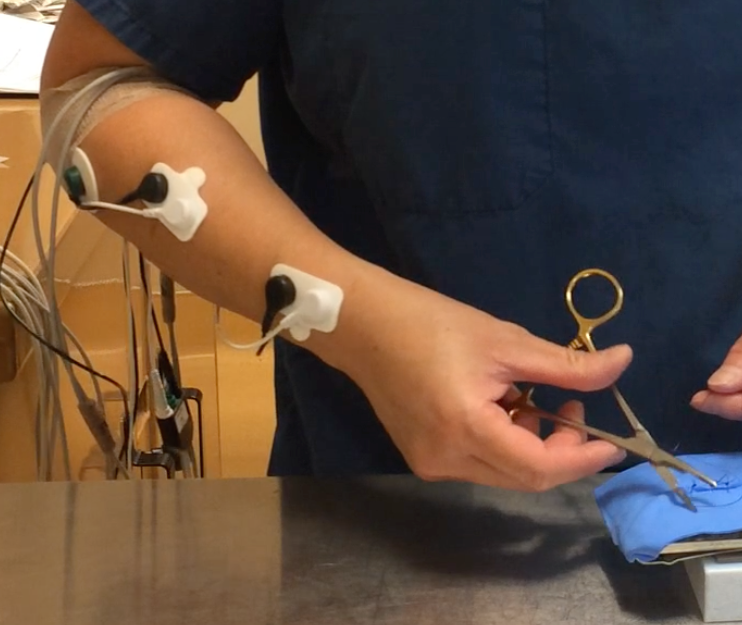
Actual observed grasps differed from those reported by participants (Figures 1-5). Video analysis revealed that 5 participants used exclusively tripod grasp with the thumb and ring finger in the instrument rings (1, 4 tripod), one of whom routinely placed her fifth finger in the instrument ring with her fourth finger. Two participants used a modified tripod grasp with the thumb and middle finger (1, 3 tripod) in the instrument rings. Three participants used palm grip for suture placement (driving the needle through the substrate) and switched to 1, 4 tripod grasp during needle extraction and knot tying (palm/tripod). Three participants used palm grasp with no fingers in the instrument rings, and one participant used a palm grasp with the ring finger in one instrument ring.
Figure 1. Instrument grasps used by study participants.: 1,4 tripod grasp
Figure 2. Instrument grasps used by study participants: 1,4 tripod grasp with fifth finger in ring.
Figure 3. Instrument grasps used by study participants: 1,3 tripod grasp
Figure 4. Instrument grasps used by study participants: Palm grasp.
Figure 5. Instrument grasps used by study participants: Palm grasp with fourth finger in ring.
Electromyography
Results of electromyographic recordings are presented in Table 2. In one participant, EMG readings were not obtained for FCU activity, as the electrodes loosened during the experiment.
Table 2. Results of low (10th % APDF), median (50th % APDF), and high (90th % APDF) muscle activities for all muscle groups and each participant. All values are expressed as a percentage of the maximum voluntary contraction (%MVC) for that muscle in that participant.
EDC: extensor digitorum communis, FCR: flexor carpi radialis, FCU: flexor carpi ulnaris, APL: abductor pollicis longus/ extensor pollicis brevis. *FCU electrodes loosened on Participant 7, preventing data collection from this muscle
The 10th % APDF, representing the static load on each of the four muscles, ranged from 0.9 to 10% MVC, with greater mean values for the extensor EDC (M = 5.51; SD = 1.37) than for the flexors FCR (M = 3.27, SD= 1.62) and FCU (M = 3.33, SD=1.53). These differences were statistically significant, with EDC:FCR t(13) = 5.082, p<0.001 and EDC:FCU t(12) = 4.824, p<0.001, two tailed. This differential activation level persisted between the EDC and FCU at the 50th and 90th % APDF, whereas the mean activity level of the FCR increased by the 50th and 90th % APDF so that there was no difference at either time between EDC and FCR activation levels (Figure 6).
Figure 6. Muscle activation of extensors and flexors at the 10th, 50th, and 90th percentile APDF, expressed as a percentage of the maximum voluntary contraction (%MVC) for that muscle.
EDC: extensor digitorum communis, FCU: flexor carpi ulnaris, FCR: flexor carpi radialis. * significant difference between mean activation levels.
The unexpected diversity of grasp styles and small number of participants using each grasp prevented adequate comparisons of muscle activation patterns between grasps.
Postural comparisons
RULA assessments produced scores of 3 or 4 in all subjects, indicating that overall postural scores did not differ substantially between subjects, and that all fell into the moderate risk category. Variations in the degrees forearm pronation and supination were noted between subjects, with a range of 80 to 180 degrees of rotation (M= 125, SD = 26.5). The degree of rotation did not appear to be related to the instrument grasp, and was positively correlated with the total pain score determined on the CMDQ and CHDQ questionnaires (r (12)= 0.556, p= 0.039).
Discussion
There has been little previous research into the physical demands of high volume spay neuter surgery. A previous study of MSD prevalence in spay neuter veterinarians (White, 2013) found a 99.1% one-month period prevalence of MSD, which is slightly higher than the 92.9% one-week period prevalence reported in the current study. The body sites with the highest prevalence of MSD were the same in the two studies, with participants most often reporting body MSD in the lower back, shoulders and neck, and hand MSD in the right distal thumb and in the right thumb base. The previous study demonstrated increased MSD risk with increased weekly surgery hours and increased years of work, an effect not seen in the current study. However, these factors had weak explanatory power, accounting for less than 5% of the variability in MSD scores. This small effect size, paired with the smaller sample size in the current study, may account for this lack of effect. Neither study showed an effect of gender on MSD prevalence.
The EMG findings of greater static load on extensors compared to flexors is likely due to the extension of the metacarpophalangeal joints required to execute any of the needle holder grasps. During median and high load conditions, greater need for wrist flexion increases flexor load. Some of the increase with load in the FCR readings may also be due to crosstalk with the superficial digital flexor (Criswell, 2011), and may be related to creating a tighter instrument grasp as greater force is required.
The amount of grasp diversity between participants, the use of non-standard instrument grasps, and the variability in individual participants’ grasps, were surprising findings in the current study. Participants were often unaware of the grasp that they used. Several described themselves using a grasp different from the one that they actually used, and some noticed in the midst of the experiment that they were using a different grasp from what they had described. Even within a single grasp type, the participants varied in their movement patterns and degrees of forearm rotation and wrist angulation.
Most of the participants claimed to have used their current instrument grasp beginning in veterinary school. However, the wide diversity of grasps, and the use of grasps not described in most veterinary or surgical texts, suggests either that the participants modified their grasps after leaving school, or that their veterinary surgical instructors taught or at least tolerated unconventional grasps. It is also possible that participants’ initial surgery instruction in veterinary school taught conventional instrument grasps, but that later in the curriculum, instructors failed to notice or failed to correct unusual grasps.
After leaving veterinary school, few practitioners receive instruction in instrument grasp or the biomechanics of surgical technique. Veterinary continuing education in surgery emphasizes processes at the “sharp” end of the instrument — the interface between instrument and patient tissue — but generally does not address the interaction between surgeon and instrument. Thus, practitioners are typically on their own as they develop and encode the motor sequences that comprise their practice of surgery.
The process of acquisition of a motor skill such as suturing requires initial cognitive attention to the task and its components. After repetition, performance becomes smoother and the need to concentrate on the task decreases. Finally, the motor sequence becomes automated and the skilled performer loses conscious awareness of individual motor actions (Ericsson, 2004). This automation of learned action sequences into performance units occurs slowly through repetition without requiring conscious awareness (Graybiel, 1998).
Surgeons and their patients benefit from the surgeon’s use of automated motor sequences. Automaticity allows the surgeon to execute complex motor sequences with relatively little cognitive load, freeing up cognitive space to attend to other aspects of surgical performance and optimal patient care. However, while beneficial, automated motor sequences may be difficult for skilled performers to describe or teach to others, to modify, or to break down into component parts (Hamdorf & Hall, 2000). In the case of veterinarians, much of this automation is likely to occur after formal surgical instruction has ceased. Thus, the grasp and movement patterns they ultimately adopt may be based on trial-and-error modifications to the techniques they were originally taught. The resulting variations in technique may be adaptive and beneficial, or they may be adequate but sub-optimal solutions in terms of biomechanics or performance (Bartlett et al., 2007).
In addition to diversity of grasps between surgeons, this study also noted instances of variability within individual surgeons’ grasps and movement patterns. In some cases, skilled performers show more variability than novices in the movements that they use to complete a task (Madeleine, 2010; Madeleine et al., 2008). This may be due to flexibility built into the automated motor sequence that they have acquired, or due to the acquisition of more than one automated motor sequence that can be used to complete the same task. For those with flexibility in their automated motor sequence, it is thought that this variability is made possible by the redundant degrees of freedom available in multi-joint movements (Srinivasan & Mathiassen, 2012). This flexibility allows the performer to adapt to perturbations and uncertainty while still completing the task (Bartlett et al., 2007).
Some skilled performers possess more than one automated movement sequence to perform the same task, and have developed these redundant motor sequences through deliberate practice and refinement (Ericsson, 2004). Among participants in the current study, three reported modifying their grasp after completing veterinary school. Two of these reported making these modifications consciously, and both sometimes use palm grasp and sometimes use 1,4 tripod grasp, selecting their grasp based on ease, comfort, and the appropriateness of the grasp to the specific suturing task.
It is likely that there is no single, unique movement pattern that optimizes performance (Bartlett et al., 2007). All of the veterinarians in the current study are experienced in high volume spay and neuter surgery, and each has performed thousands of procedures. The diversity in grasps, movement patterns, and muscle use described in this study all represent functional variations upon the task of suturing. Nonetheless, surgeons may benefit from developing multiple functional movement patterns that can be used to achieve the same task, both because this flexibility may lead to improved surgical performance, and because the increased variability may decrease repetitive strain.
Differences between individuals performing the same task make it difficult to characterize biomechanical exposure and consequent risk based on job description or work hours, and also suggest a possible mechanism for the differences between individuals in MSD susceptibility (Srinivasan & Mathiassen, 2012). The current study did not evaluate variability per se, and only examined a single task within the larger task of surgery, so was not adequate to see the scope of variability within spay neuter work. Future research could examine whether increased motor variability in surgery can be taught, and if so, the optimal amount and type of variability. Also, future studies could examine whether teaching a new grasp and motor sequence could allow a surgeon to recover from MSD, and whether surgeons with more than one grasp and corresponding automated motor sequence are more resilient than those with a single movement pattern.
Conclusions
The present study found an unexpected diversity of needle holder grasps used by spay neuter veterinarians while suturing. All were characterized by extensor dominance during static load. Future investigation into the characteristics and benefits of various grasps is warranted, so that practical advice on reducing strain and MSD risk can be offered to surgeons. In addition, examination of current surgical instruction and learning may help explain the origination of the diversity of grasps encountered here.
Anderson, R.M., & Romfh, R.F. (1980). Technique in the use of surgical tools. New York: Appleton-Century-Crofts.
Bartlett, R., Wheat, J., & Robins, M. (2007). Is movement variability important for sports biomechanists? Sports Biomech, 6(2), 224-243. doi: 10.1080/14763140701322994
Berguer, R., Gerber, S., Kilpatrick, G., Remler, M., & Beckley, D. (1999). A comparison of forearm and thumb muscle electromyographic responses to the use of laparoscopic instruments with either a finger grasp or a palm grasp. Ergonomics, 42(12), 1634-1645. doi: 10.1080/001401399184721
Booth, H.W. (2013). Instrument and tissue handling techniques. In K. M. Tobias & S. A. Johnston (Eds.), Veterinary surgery: Small animal: 2-volume set (pp. 201-213): Elsevier Health Sciences.
Criswell, E. (2011). Cram’s introduction to surface electromyography (2nd ed.). Sudbury, MA: Jones & Bartlett Publishers.
de Almeida, P.H., da Cruz, D.M., Magna, L.A., & Ferrigno, I.S. (2013). An electromyographic analysis of two handwriting grasp patterns. Journal of electromyography and kinesiology, 23(4), 838-843. doi: 10.1016/j.jelekin.2013.04.004
Ericsson, K.A. (2004). Deliberate practice and the acquisition and maintenance of expert performance in medicine and related domains. Academic Medicine, 79(10), S70-S81.
Graybiel, A.M. (1998). The basal ganglia and chunking of action repertoires. Neurobiology of learning and memory, 70(1), 119-136.
Hägg, G., Melin, B., & Kadefors, R. (2004). Applications in ergonomics. In R. Merletti & P. Parker (Eds.), Electromyography: Physiology, engineering, and noninvasive applications (pp. 343-363). Hoboken, NJ: John Wiley & Sons, Inc.
Hamdorf, J., & Hall, J. (2000). Acquiring surgical skills. British Journal of Surgery, 87(1), 28-37.
Hedge, A. (n.d.). Cornell musculoskeletal discomfort questionnaires (cmdq). Retrieved 4 January, 2015, from http://ergo.human.cornell.edu/ahmsquest.html
Kirpensteijn, J., & Klein, W. (2006). Instruments. In J. Kirpensteijn (Ed.), Cutting edge: Basic operating skills for the veterinary surgeon (pp. 31-43). Ripon: Roman House Publishers Ltd.
Kozak, A., Schedlbauer, G., Peters, C., & Nienhaus, A. (2014). Self-reported musculoskeletal disorders of the distal upper extremities and the neck in german veterinarians: A cross-sectional study. PLoS ONE, 9(2), e89362. doi: 10.1371/journal.pone.0089362
Latko, W.A., Armstrong, T.J., Franzblau, A., Ulin, S.S., Werner, R.A., & Albers, J.W. (1999). Cross-sectional study of the relationship between repetitive work and the prevalence of upper limb musculoskeletal disorders. American Journal of Industrial Medicine, 36(2), 248-259. doi: 10.1002/(SICI)1097-0274(199908)36:2<248::AID-AJIM4>3.0.CO;2-Q
Looney, A.L., Bohling, M.W., Bushby, P.A., Howe, L.M., Griffin, B., Levy, J.K., Eddlestone, S.M., Weedon, J.R., Appel, L.D., Rigdon-Brestle, Y.K., Ferguson, N.J., Sweeney, D.J., Tyson, K.A., Voors, A.H., White, S.C., Wilford, C.L., Farrell, K.A., Jefferson, E.P., Moyer, M.R., Newbury, S.P., Saxton, M.A., Scarlett, J.M., Association of Shelter Veterinarians, S., & Neuter Task, F. (2008). The association of shelter veterinarians veterinary medical care guidelines for spay-neuter programs. Journal of the American Veterinary Medical Association, 233(1), 74-86. doi: 10.2460/javma.233.1.74
Madeleine, P. (2010). On functional motor adaptations: From the quantification of motor strategies to the prevention of musculoskeletal disorders in the neck-shoulder region. Acta physiologica, 199 Suppl 679, 1-46. doi: 10.1111/j.1748-1716.2010.02145.x
Madeleine, P., Voigt, M., & Mathiassen, S.E. (2008). The size of cycle-to-cycle variability in biomechanical exposure among butchers performing a standardised cutting task. Ergonomics, 51(7), 1078-1095. doi: 10.1080/00140130801958659
Matern, U., Kuttler, G., Giebmeyer, C., Waller, P., & Faist, M. (2004). Ergonomic aspects of five different types of laparoscopic instrument handles under dynamic conditions with respect to specific laparoscopic tasks: An electromyographic-based study. Surgical Endoscopy And Other Interventional Techniques, 18(8), 1231-1241.
McAtamney, L., & Corlett, E.N. (1993). Rula: A survey method for the investigation of work-related upper limb disorders. Applied Ergonomics, 24(2), 91-99.
Perotto, A. (2011). Anatomical guide for the electromyographer: The limbs and trunk: Charles C. Thomas Publisher, Limited.
Scuffham, A.M., Legg, S.J., Firth, E.C., & Stevenson, M.A. (2010). Prevalence and risk factors associated with musculoskeletal discomfort in new zealand veterinarians. Applied ergonomics, 41(3), 444-453. doi: 10.1016/j.apergo.2009.09.009
Seki, S. (1988). Suturing techniques of surgeons utilizing two different needle-holder grips. American journal of surgery, 155(2), 250-252.
Smith, D.R., Leggat, P.A., & Speare, R. (2009). Musculoskeletal disorders and psychosocial risk factors among veterinarians in queensland, australia. Australian veterinary journal, 87(7), 260-265. doi: 10.1111/j.1751-0813.2009.00435.x
Soueid, A., Oudit, D., Thiagarajah, S., & Laitung, G. (2010). The pain of surgery: Pain experienced by surgeons while operating. International journal of surgery, 8(2), 118-120. doi: 10.1016/j.ijsu.2009.11.008
Srinivasan, D., & Mathiassen, S.E. (2012). Motor variability in occupational health and performance. Clinical biomechanics, 27(10), 979-993. doi: 10.1016/j.clinbiomech.2012.08.007
Szeto, G.P., Straker, L.M., & O’Sullivan, P.B. (2009). Examining the low, high and range measures of muscle activity amplitudes in symptomatic and asymptomatic computer users performing typing and mousing tasks. European journal of applied physiology, 106(2), 243-251. doi: 10.1007/s00421-009-1019-4
Toombs, J.P., & Bauer, M.S. (1993). Basic operative techniques. In D. Slatter (Ed.), Textbook of small animal surgery (2nd ed., Vol. 1, pp. 168-191). Philadelphia, PA: Saunders.
Weiss, Y. (1973). Simplified method of needle-holder handling. Archives of Surgery, 106(5), 735-736.
White, S. (2013). Prevalence and risk factors associated with musculoskeletal discomfort in spay and neuter veterinarians. Animals, 3(1), 85-108.
Yoon, H.-Y., & Mann, F.A. (2011). Instrument handling. In F. A. Mann, G. M. Constantinescu & H.-Y. Yoon (Eds.), Fundamentals of small animal surgery (pp. 128-142).
Like a lot of people, I find myself working from home these days. Between the needs for social distancing and for preserving medical supplies, my “day job” as a spay neuter vet has been sidelined, so I find myself dreaming up new projects and spending more time in front of a screen.
As we find ourselves building office spaces at home, we may be faced with combining computers, chairs, and desks that were not designed for use together or that don’t fit well with our physical needs or proportions.
But what does a good ergonomic setup look like? Are there ways to improve a home office to make it more comfortable for more hours of use?
My home office setup
In order to explain some of the fundamentals of office ergonomics, I will use my own home office setup as an illustration. This is the space that I’ve used for various writing and editing projects, so I have been tinkering with the setup for a while to make the space comfortable for long periods of use. But you’ll also see that I have improvised a few solutions for items that just weren’t sized for me.
My home office. My laptop computer (red arrow) is connected to an external monitor and wireless keyboard. My mouse (green arrow) is elevated on a platform, and my feet are also on a riser (pink arrow). I’m using a chair with adjustable height and adjustable arm rests (yellow arrow).
Computer Equipment
I have a laptop computer and I love the flexibility and portability. When I am using the computer for reading (for example, reading an article or editing a book chapter), I’m usually on the sofa or a recliner rather than in a desk-and-chair setup. But when I really want to get down to work and do a lot of typing or visual design (for example, writing this post, writing a book, editing photos) I use my laptop with an external monitor and wireless keyboard, essentially turning it into a desktop computer.
Laptop ergonomics
The problem with laptops is that they are built for portability rather than good ergonomics. When the keyboard is at a comfortable height (say, on a pillow on your lap on the couch), the screen is too low so you end up with your neck bent at something like a 30 degree angle. This may be especially problematic for people (like surgeons) who already have jobs that necessitate a forward-bent neck.
Conversely, when the laptop screen is elevated to a height that allows the user to look at the screen with minimal neck bending, the attached keyboard is much too high for comfortable use.
It is possible to have good ergonomics with a laptop and either an external monitor or a separate keyboard. To use a laptop with a separate keyboard, the laptop should be placed on a laptop stand or an elevated platform (a box, a stack of books) that places the top edge of the laptop screen at or slightly above eye level, and the keyboard should be placed at or just below elbow level. To use a laptop keyboard with a separate monitor, the monitor should be placed so that the top edge of the monitor is 2-3 inches above eye level, and the laptop placed so that the keyboard is at or below elbow level.
I chose to have both an external monitor and external keyboard because I want a large monitor (for giant spreadsheets or side-by-side editing) and also a larger, more supportive keyboard compared to the built-in laptop keyboard. So in my setup, the laptop sits closed on the monitor base and provides the processing and computing power, but I don’t use the laptop screen or keyboard when I’m working at a desk.
Keyboard
The computer keyboard should be placed at or below elbow level. Most keyboards are level or slope slightly towards the user, but some research has shown that it’s actually better for hand and wrist posture if the keyboard is tilted slightly “downhill”away from the user.
My keyboard and mouse. The keyboard tray height is good for keyboarding, but too low for mousing, so a textbook serves as a mouse pad platform. Note also the closed laptop computer and the separate number keypad.
For regular typing (words, sentences, paragraphs), the keyboard should be centered in front of you. However, if your keyboard has an attached number pad and you are doing a lot of number entries, you will have the least strain if the number pad is located in easy reach of your dominant hand, which may mean that the keyboard is placed off center from your body.
The keyboard that I use has a separate number pad. The main reason that I like this is so that the keyboard itself is more compact, which means my mouse can be placed closer to my hands. With my previous long keyboard with attached number pad, I found myself constantly leaning, straining, or twisting to reach the mouse, especially at times when I was alternating between mousing and typing.
The best type of chair for home office work will vary with the type of computer work being done, and also depends on the person or people using that seating. Most of the time, an office chair with adjustable height, adjustable back rests including lumbar support, and adjustable arm rests is recommended. Unless the chair back is reclined to 120 degrees or greater, a headrest is not necessary (although some may find it comfortable to have one).
The chair should fit the user: the width of the seat pan should support your thighs but not be so long that it contacts the backs of your knees, as this may be uncomfortable and may also obstruct blood circulation. The width of the seat pan should allow an inch or so between the outside of the thighs and the armrests. Armrests that are mounted to the chair back rather than on pillars attached to the seat pan will allow a bit more thigh clearance for those that would benefit from this. For users who can not find a chair whose arm rests are placed far enough apart to fit their thigh width comfortably, an armless chair may be most suitable. Similarly, in circumstances where the job demands getting up and down often, chair arms may get in the way and an armless chair (or a chair whose arms swing out of the way) may be better for these jobs.
Adjusting the chair
The height of the chair should be adjusted so that the user’s feet can be placed flat on the floor. While this seems simple enough, if you are working with a fixed height desk and adjustable height chair, you may find that when the chair height is adjusted properly for the length of your lower legs, the desk height is all wrong for the height of your keyboard (see the previous section on keyboards).
My elevated footrest: a textbook from the first semester of ergonomics graduate school. I’m pretty sure the authors would be proud of the ongoing use of their heavy tome.
If your legs are short and/or your desk is high and fixed height, a footrest can help fix the geometry of your office space. There are commercially made footrests for office workers for just this reason. In my case, I improvised, using a textbook as a footrest, and have been content with this solution.
If your legs are long, once you have adjusted your chair you may find that your desk is too low and not adjustable. Elevating the desk using wood blocks or bed risers would get the geometry back in sync.
If you are working with a chair without height adjustments, you may have to improvise a bit on your office configuration in order to get the geometry of your office as low-stress (ergonomically) as possible.
Armrests
Armrests should be adjusted to the height of the user’s elbows while seated. Most of the time while using the computer, you don’t actually use the armrests: as I am typing in the picture below, my arms are not on the armrests at all. However, in the next picture I use both armrests as I sit back and use the mouse and not the keyboard
Keyboarding posture. When I’m keyboarding I don’t use the arm rests. I’ve pulled my chair a little further forward than when just reading or mousing, so that the arm rests overhang the keyboard tray by a few inches. My elbows are relaxed by my side. The keyboard tray is low enough and slightly angled downward to avoid having an extended wrist angle.
Mousing posture. I’m using both armrests and leaning back on the chair back. My right armrest, along with the elevated mouse pad, lets me keep a straight wrist and relaxed hand while I cruise Google Scholar.
Desk
The ideal desk would be adjustable in height and would have a separate keyboard tray that was also adjustable. My own desk has one out of two: it has the keyboard tray, but the desk and tray are at a fixed height from the ground. This fixed height is the reason I have to raise my chair enough that I require a footrest. If my desk (or even just the keyboard tray) was adjustable, I would be able to lower the keyboard by a couple of inches, lower my seat, and not need the footrest.
Positioning and posture
The screen is about an arm’s length from my face.
Once you have the computer equipment and you have adjusted the chair and desk (and optional footrest and any other MacGyver ergonomic devices), the next task is figuring out how to positioning use them.
The monitor or screen should be about arm’s length away. Most of the time, the monitor should be straight ahead of the user. For tasks where you will be using one side of the monitor more than the other (left-justified word processing on a wide screen), it may be best to center yourself on the working part of the screen.
If you will be using more than one monitor, centering can be more difficult. If both monitors are used equally then you can place the dividing line between the two straight ahead so that you don’t have to look very far to either side to see either screen. If one of the two monitors is used much more frequently, then that one should be straight ahead and the secondary monitor placed nearby in the field of view (beside or perhaps above or below the main monitor)
posture
Your body posture should be relaxed and supported by your chair, just as your lower legs are supported by the floor or footrest. Your chair is the anti-gravity device that keeps you from having to expend muscular effort to keep yourself upright. Sit in your chair in a way that lets you take advantage of this.
Computer posture. Sitting up at a 90 degree angle as in the first photo (90 degree angle between thighs and back) takes muscular work. It’s not wrong, but it’s hard to maintain for an hour or a day of computer use. When you lean back on your chair back so that your back angle is about 110 degrees from your thighs, you can use the back of the chair to do the work for you.
And remember, just like when doing surgery, it’s important to take breaks to rest and stretch. Much of the early research on micropauses took place in an office environment, and the data supporting break-taking as a way to decrease fatigue and pain and increase performance is impressive. Micropauses can be just a minute or so every twenty or thirty minutes and should consist of changing position and stretching or moving. Try set a timer for microbreaks or, failing that, try to hydrate enough that trips to the bathroom are inevitable reminders to pause and stretch.
What about standing desks?
Standing desks are a great idea for encouraging movement and offering a change in position through the day. As someone who stands for work most of the time, I haven’t set up a standing desk for myself. Ergonomists don’t necessarily find that standing desks are better than sitting, but what they do find is that being able to change position through the work day is important.
Some workplaces have adjustable height desks and chairs so that workers can remain at the same workstation and, with the press of a button, convert that workstation from sitting to standing and then back again. People working from home (especially on a short term, emergency basis such as during a pandemic) are much less likely to have these adjustable desks and so must improvise. One worthwhile option is to configure both a standing desk and a sitting desk, and perhaps have each of these spaces set up for different tasks, so that desk height switching is enforced whenever task switching is necessary.
For standing desks, the relative configuration of the keyboard and monitor with respect to the user’s eyes, shoulders, and elbows should be the same as for sitting desks. The top of the monitor should be slightly above eye level. The keyboard should be at about elbow height or slightly below when the shoulders are relaxed and the upper arms hang slightly in front of vertical beside the body. Flooring and footwear should be comfortable, and consider using a floor mat, especially if standing for several hours.
Meanwhile…
Moe judges me while I try on my mask.
As for me, I’ve been healthy but find myself on an enforced vacation of unknown length. Unlike other jobs where you can work from home, spay-neuter doesn’t work well from a distance. I made myself a surgery mask in hopes that I could donate my my disposable masks but still return to work sometime soon, but for the short (and medium?) term, it looks like self-isolation is key.
So what is a spay neuter vet and book editor to do? I’m seriously toying with writing the next textbook, the one I’ve known for years was needed but never had the time to work on: Ergonomics in Veterinary Medicine. Will I or won’t I? I’ll let you know as soon as I know…
Those of you who have spent any time with me during the past 2 years have probably heard about my work as the editor of the long-awaited Spay Neuter Textbook. Well, it’s finally here! The e-book version has been available for a few months, but the print copies just arrived at the publisher’s this week.
Want to order a copy? This link will take you to Wiley’s page for the book with links to various sellers. And when you receive your copy, let everyone know what you think by reviewing the book on Amazon.
This book is the product of the dreams and hard work of a lot of people: there are dozens of contributing authors with a variety of areas of expertise, and I have been honored and humbled to work with them all.
So what’s in the book? Who is it for?
I could write a long blog post on this from scratch, but I realized that I already answered these questions when I wrote the book’s preface and acknowledgements. So I’ve included these two sections here to answer these questions and to provide a sense of the history, context, and organization of the book.
I hope that this is the book you’ve been looking for — enjoy!
Why do we need a spay-neuter textbook?
Spaying and neutering are often the first (and in some cases, the only) surgeries that students learn in veterinary school, and are expected skills for every new graduate in general small- or mixed-animal practice. It can be tempting to dismiss them as “beginner surgeries,” the easily trivialized but sometimes terrifying rites of passage into the veterinary profession. Perhaps because spaying and neutering are skills learned so early and repeated so often in a general practitioner’s veterinary career, they are rarely the subject of continuing education seminars and articles, and general practitioners may go their entire career without modifying or even questioning the techniques for spaying and neutering that they learned as third-year veterinary students.
At the same time, spaying and neutering have been central to efforts to reduce the overpopulation and euthanasia of unwanted and unowned cats and dogs. The spay-neuter clinics and programs that arose over the past several decades recognized the need for minimally invasive, efficient techniques that would shorten surgical times and improve patient recovery. This textbook pulls together many of the surgical, anesthetic, perioperative, and operational techniques discovered, developed, and popularized over the decades by these innovative spay-neuter pioneers.
High-Quality, High Volume Spay Neuter (or HQHVSN, the awkward but now widely used acronym adopted by the first Spay Neuter Task Force) is the field of veterinary medicine that began with the efforts of spay-neuter pioneers in the 1970s through 1990s and became firmly established and advanced by the publication of the 2008 and 2016 spay-neuter guidelines. HQHVSN is defined as “efficient surgical initiatives that meet or exceed veterinary medical standards of care in providing accessible, targeted sterilization of large numbers of cats and dogs to reduce their overpopulation and subsequent euthanasia”(Griffin et al., 2016).
Until now, practitioners new to HQHVSN or isolated in their practice have had no single place to turn to find out about HQHVSN techniques and protocols and the evidence supporting them, or about spay-neuter program types, their implementation and staffing, and their effects on animal populations and individual animal health. Many of the techniques used in HQHVSN have been taught at conferences and mentorship programs and shared and spread between practitioners, and many have been subjects of peer reviewed research; however, few appear in textbooks. Nevertheless, the medical, surgical, and perioperative care described in this book need not be limited to high-volume or shelter settings—they are applicable wherever veterinary surgery is performed.
This book is divided into two parts, and each of those parts divided into several sections. Part 1, Clinical Techniques and Patient Care, is concerned with evidence-based clinical knowledge and skills including perioperative, anesthetic, and surgical techniques. Part 2, Fundamentals of HQHVSN, introduces the high-volume surgical setting and the special organizational, logistical, and epidemiologic challenges that arise when striving to optimize the clinic’s operations and impact.
The book is intended for a range of audiences: from the veterinary student to the experienced HQHVSN practitioner, and from the veterinary technician to the aspiring spay-neuter clinic founder. Part 1 begins with chapters on determination of patient sex and neuter status, reproductive anomalies and pathologies, the selection of surgical instruments and suture, infectious disease control, asepsis, and stress reduction in the clinic. The sections on anesthesia and surgery cover general principles as well as specific techniques and protocols, including chapters on avoiding and managing both anesthetic and surgical complications, and a chapter on anesthetic and surgical techniques in rabbits and other small mammals.
While many of the techniques covered in Part 1 are well known to experienced HQHVSN surgeons, some of the anomalies, complications, and complicated presentations are unusual and may be once-in-a-lifetime cases for some. Experienced practitioners may also learn of useful variations on or alternatives to their accustomed techniques, or learn new ways of preventing or addressing frustrating complications.
Part 1 concludes with a section on other common shelter surgeries and associated anesthetic procedures, and can serve as a reference for shelter surgeons with a variety of levels of experience. This section includes amputations, eye surgeries, vulvar or rectal prolapse treatment, and dental extractions.
Part 2 of this book moves away from the clinical care of individual patients and into the structures and systems fundamental to HQHVSN, with sections on population medicine, human resources and wellbeing, and HQHVSN program models. Optimizing the potential of HQHVSN requires more than just proficiency in the clinical care (anesthesia and surgery) of individual patients. Effective HQHVSN programs must understand the effects of their interventions on animal populations and individuals; they must combine their clinical skills with appropriate staffing and facilities to allow an efficient and streamlined workflow; they must institute systems that are financially, physically, and emotionally sustainable. Chapter 23 serves as an introduction and roadmap to the second half of this book. The material in this second half of the book should be of interest to anyone seeking to establish a new HQHVSN program or improve an existing one.
Acknowledgements and Deepest Thanks…
First, I want to thank the original four editors of the book: Brenda Griffin, Karla Brestle, Philip Bushby, and Mark Bohling. These four veterinarians have been instrumental in establishing and promoting the field of HQHVSN; this book would not have existed without them. I have had the privilege of working with all four of these people in different capacities over the past decade and a half: as teammates on the ASV spay neuter task force and co-authors on the 2008 and 2016 Guidelines, as co-teachers in pediatric spay neuter wet labs, and finally as contributing authors to this textbook. Thank you for being my mentors and colleagues, and for believing I could do this. Thanks especially to Brenda, who during my editorship has been my cheerleader and sounding board, my informant and historian, and a bridge between the original vision for this book and its evolution and re/vision. The encouragement, context, and friendship you have offered throughout this process has supported and inspired me.
I also want to thank all the HQHVSN and shelter veterinarians I have met over the years in person and online. My early teachers in this field were all virtual (but real!) colleagues who took the time to explain and describe surgical techniques in words, back in the days of dial-up internet, before YouTube. From the sheltervet electronic mailing list that I joined in 2001 to today’s shelter veterinary and spay neuter Facebook communities and hqhvsnvets online group, you have been and continue to be my mentors and my inspiration. Thank you also to my online colleagues who contributed photos for this textbook—your eagerness, openness, and surgical and photographic skills have made this book better.
And a huge thank you to all the authors who have contributed chapters to this textbook. It is your expertise that has driven the field of HQHVSN forward and that makes this book all that it is. This book is a first edition, but it is also a revision: by the time I signed on as editor in early 2018, many of the submitted manuscripts had become dated. I want to thank the authors for their patience and willingness to revise or even overhaul these chapters in order to make the materials as relevant, timely, and useful as possible.
And finally, thanks to my wife Tina, who kept the refrigerator full and the woodstove stoked during my many long hours of writing and editing.
Want to order a copy? This link will take you to Wiley’s page for the book with links to various sellers. And when you receive your copy, let everyone know what you think by reviewing the book on Amazon.
This post goes along with the JIFFI post about surgical hand hygiene from last year, since it’s about a low-cost way of keeping the surgical environment clean. For a lot of people, this will be old news, but for anyone who hasn’t used calcium hypochlorite to disinfect in their clinic, or who is wondering about the research behind this disinfectant and its preparation, read on–
Origin story
Back in the fall of 2010, in the days of Trifectant, before accelerated hydrogen peroxide took the shelter disinfection world by storm, my friend Brenda was raving about a kennel cleaner called Wysiwash. The active ingredient is calcium hypochlorite, and the product is sold as a hose-end sprayer for kennel disinfection. There was a lot to be excited about: it’s cheap and effective against most of the pathogens we’re worried about in veterinary care, it’s much less irritating than bleach, and it doesn’t need to be rinsed away.
But I have a MASH mobile spay neuter clinic: I don’t have kennels or a hose, and I only need a gallon or two of disinfectant every day. How could I use this product? Sure, I could put a hose-end sprayer on a hose at home and fill a jug, but how would that work in the winter when the hoses are frozen solid? I decided there had to be some other way to purchase and mix calcium hypochlorite.
Researching an alternative
After spending some time on Google, I found that one of the most easily available forms of calcium hypochlorite is swimming pool shock. But how much to use? And which type?
Fortunately, Wysiwash and many of the pool shock suppliers also provided online copies of MSDS (now SDS) sheets listing the chemical composition of each product. After downloading a bunch of these MSDS sheets, I was able to find Turbo Shock, a pool shock product with the same chemical composition– the same components, in the same proportions– as Wysiwash. Turbo Shock is supplied as a white granular powder and can be purchased in a 1-pound bag.
Next I had to figure out how much to use. For that, I turned to the technical information page on the Wysiwash site and found this paper describing how to make a 2x solution of Wysiwash in the lab. Armed with that information and the density of the pool shock (also from the MSDS), I was able to make the calculation that you would need just over 1/16 teaspoon of Turbo Shock per gallon of water to make the same strength solution as the hose-end sprayer. For practical reasons (the smallest plastic measuring spoon I can find is 1/8 tsp, and metal measuring spoons rust almost immediately when used in pool shock), I end up using a 2x concentration, mixing 1/8 tsp per gallon. At this rate, it takes me a few years to go through just one bag of Turbo Shock.
I started using this solution that fall, and by spring of 2011, I mentioned Turbo Shock using in a conference presentation at the SNIP Summit in Asheville. After that presentation, other spay neuter and shelter vets have started using calcium hypochlorite solution made from pool shock, especially for disinfecting endotracheal tubes, masks, and pulse oximeter probes between patients, and in some cases for disinfecting animal contact surfaces such as scales and tables.
But wait…!
So I know what y’all are thinking: “What about that 2015 article by Dr. Karen Moriello showing that calcium hypochlorite was ineffective against ringworm?” I read this one too, but I’m not quite ready to throw the baby out with the pool water.
In this study, in order to obtain the calcium hypochlorite solution, a Wysiwash hose-end sprayer was used and the solution was collected midstream after the hose had run for 3 minutes. One of the downsides of a hose-end sprayer is that you have to take it on faith that the correct amount of disinfectant is being dispensed at any given moment. This made me wonder– what if the solution that was being dispensed from that hose was not as concentrated as it should have been? What if there was something wrong with the sprayer and there wasn’t any calcium hypochlorite in it at all? The strengths of the various solutions used in the study were never verified; for the study design, this was appropriate (after all, she was using kennel disinfectants according to label and assessing their effectiveness), but it doesn’t tell me for sure that a solution of calcium hypochlorite is ineffective against ringworm fungus.
So if any of you who are reading this are students, interns, or residents and you’re looking for a project, I would love to see the calcium hypochlorite portion of this study replicated with a known or verified concentration of the chemical. This could be done by testing the chlorine content of the solution, which should be between 60-70 ppm for a 1x solution or about 120 ppm for a 2x solution, and could be tested with commercial chlorine test strips. Why not test both strengths and let us all know how it turns out?
Pro tips
As I mentioned above, calcium hypochlorite powder can corrode metal when in prolonged contact (I have had no problem with the mixed solution causing damage when disinfecting metal surfaces, though). Avoid using a metal measuring spoon. I’ve also been told that one clinic that stored a bag of pool shock under their sink found that just the fumes from the bag of pool shock corroded the metal pipes under the sink– so be careful and store away from metal. Plastic measuring spoons and plastic storage containers seem to hold up well.
Since it takes me a long time (years) to go through a 1-pound bag of Turbo Shock, I dispense the powder into a labeled pill vial to carry with me to clinics. I re-seal the pool shock bag by rolling down the edge and using a rubber band to secure it (the metal clip in the photo attached to this blog post? Completely rusted now).
It’s also probably obvious (if you think about swimming pools, or chlorine bleach), but calcium hypochlorite is not a detergent or a cleaner: it’s a disinfectant, but it won’t do any more than water would do to clean slimy, messy, dirty objects. For anything that’s dirty, slimy, etc (including endotracheal tubes), clean first (soap and water!), then disinfect.
Years ago, in 2011, I set out to study spay neuter veterinarians with the aim of finding out about musculoskeletal pain risk factors and what we might be able to do about them. The resulting study was published here, but as with many research surveys, I collected data as background information that never made it into a publication (other than as a poster abstract in the 2012 Midwest Veterinary Conference proceedings). Although this extra data is not exactly groundbreaking, there are some interesting tidbits about our field, and even though the results are from a 2011 survey, I think many of the findings are still relevant. This is exactly the sort of research that the Journal of Incidental Findings and Freelance Inquiry (JIFFI) was designed to publish. So enjoy!
Characteristics of spay and neuter employment positions and contributors to efficiency
Methods: Online survey of veterinarians who currently or previously spay and neuter at least 4 hours per week. Responses were solicited via the Association of Shelter Veterinarians’ Sheltervet listserv, the HQHVSNvets listserv, and conference attendees at the 2011 SNIP Summit, yielding 228 useable responses.
Results:
Where do spay neuter vets work? Lots of places, though most are in a stationary venue. And a lot of spay neuter vets work in more than one place, too– more than one shelter or clinic, or doing mobile and stationary spay neuter work for the same organization.
Of veterinarians in the four most common clinic types, mobile veterinarians have the longest total workdays (median 12 hours) and perform the most surgeries (median 34 daily) with a large staff (median 4 per veterinarian), but their surgery time is similar to veterinarians in stationary clinics and shelter clinics serving the public (median 6 hours daily). Shelter-only clinics see fewer patients (median 18) in a shorter surgical workday (median 5 hours) with fewer staff (median 2 per veterinarian).
Clinics with 4 or more staff or volunteers per veterinarian performed more surgical units per hour (median 5.4) than clinics with one (3.28), two (4.57), or three (4.69) staff per veterinarian.
Approximately half of the surveyed veterinarians (116/216) work full time in spay/neuter. For part-time spay/neuter veterinarians, in addition to having other job duties that limit time in spay/neuter, factors preventing full time spay/neuter work include finances (14.8%), prevention of burnout (58.2%), physical and musculoskeletal health (45.1%), family (36.0%), and limited availability of spay/neuter jobs (41.6%).
I like lunch, so I asked about it. Most spay neuter vets don’t take a lunch break during their spay neuter work day. It’s not necessarily as daunting as all that, though– many vets finish surgery mid-day, so can eat before and after surgery rather than breaking in the middle of surgery. For my MASH clinics, though, I insist on a sit-down lunch break if the surgery day will last past about 1:30 pm. Less efficient, maybe. Less hangry, definitely.
Discussion:What are the takeaways from this snapshot into the spay neuter workplace of 2011?
For me one of the most obvious, intuitive, but potentially overlooked (by management) findings is that having more support staff equals more surgeries per hour.
Since finding out about staffing levels wasn’t the main objective of the survey, there is still a lot we can’t say about how staffing and surgeries per hour relate to each other. I assume that having more staff doesn’t actually make a surgeon cut and sew faster– it just means that the surgeon gets to spend more time cutting and sewing, and less time restraining, injecting, waiting, or doing any other activity that keeps them away from the surgery itself.
For low volume clinics, this decreased efficiency from lower staffing levels may not be a problem. Sure, things could go more quickly, but the work gets done. But for anyplace looking to increase their efficiency, increasing staffing level is a good place to start.
Is this what our field of HQHVSN looks like now? Probably, mostly yes. Maybe I’ll ask again in a few years…
MASH spay and neuter clinics are nothing new for me: during the past 13 years I’ve done well over 1000 MASH clinic days in Vermont and New Hampshire. My own MASH clinics are small: one veterinarian, one veterinary technician, and between 2 and 10 other volunteers or shelter staff. We set up our clinic for just a day at a time and see somewhere between 20 and 60 patients in a day (depending on dog or cat, male or female).
But recently, I’ve had the chance to participate in Spayathon for Puerto Rico: four, one-week-long rounds of multi-site, multi-vet MASH clinics. I’ve spent Spayathon Rounds 2 and 3 with the group Veterinarians for Puerto Rico, a fabulous new group formed in the wake of Hurricane Maria. The Spayathon for PR clinics are large: some sites like ours served between 150 and 200 (or so) patients a day with about 4-7 veterinarians in surgery each day, while the biggest location served about 500-600 patients a day with about 20 vets in surgery each day. Lots of people have posted cute pictures of pets and owners at Spayathon and talked about the rewarding and exhausting experience of volunteering– just search #spayathon4pr to see some examples– so here I’m going to talk about the logistics and flow (physical and organizational ergonomics) of running a large MASH clinic like this.
Before: The community center in Toa Baja that would become the Vets for PR surgery site during Spayathon4PR round 3. The surgery area pictured at the beginning of this post is the area to the left in this picture.
Without these volunteers, Spayathon would not be possible
Large MASH clinics are full of logistical challenges. How do we create a safe and efficient flow of animals through the clinic? How do we keep the animals and the people as safe and un-stressed as possible? How do we make the best use of the space we have for the clinic? How do we make the best use of the dozens of volunteers at each site?
This round, utilizing our limited indoor space as efficiently as possible was one of our biggest challenges in Toa Baja. While the community center looked large when it was empty, it was much smaller than the sports arena we had occupied in round 2 in Aguada.
A client waits with her dog until it’s time for her dog to go inside for surgery
One of the space-savers was using the covered balcony area for dog physical exams; clients and dogs also waited outdoors (under the cover of tents, on the balcony, in the shade of the building, or on the small lawn) until it was their dog’s turn for surgery. When it was time for the dog to come inside for surgery, the owner was there too. Pets who had received their anesthetic injection waited in their owners arms or on a bed on the floor until the sedation kicked in and they fell asleep.
Clients wait with their dogs in the induction area. The dogs closest to the curtain towards the back of this picture have received an anesthetic injection.
Cats were a little different (they’re cats after all…). We admitted the cats in their carriers into the building so that they could have physical exams in a confined space, rather than using the open-air balcony with the dogs.
Cats and more cats waiting for physical exams
Watching cats fall asleep may not be the most glamorous job, but it’s one of the most important.
Once the cats were examined, they could be injected with anesthesia and brought out to a post-induction table (aka Kitty Sleepover Party) where they could be under continuous observation until they were anesthetized enough to move to a surgery prep table.
Dogs too were moved into surgery prep– this is where their pathway merges with that of the cats. And after prep, patients were moved to an unoccupied surgery table.
Veterinarians for Puerto Rico surgery area during Spayathon for Puerto Rico Round 3 in a community center in Toa Baja. The Kitty Sleepover Party table is located in the lower left of this picture, and surgical prep tables are on the lower right. The entrance from dog induction is to the right, outside the view of the photo. In the background are the 10 surgery tables (8 around the edges, two in the center), each with an anesthesia machine.
As in many high volume settings (but not in my own MASH clinics), the Vets for PR surgery area had more surgery tables than surgeons. This mean the surgeons don’t have to wait for the exchange of patients on their table; they can re-glove and move directly on to the next surgery. It also allows the postoperative patients an extra minute or two on the anesthesia machine, to breathe oxygen and breathe out the anesthetic gases before being moved to recovery.
The beach
After surgery, animals were moved directly to Recovery 1, or “the beach.” Here they were attended by a team of veterinarians, technicians, students, and volunteers who watched their recovery and recorded their temperature, pulse, and respiration at intervals throughout their recovery. The beach was all soft padding, heating pads, and “warmies,” the hot water bottles and rice socks that were microwaved and re-microwaved throughout the day to help the patients warm up. (The air-conditioned facility, while comfortable for most of the workers, was chilly for anesthetized patients, so we had to make efforts throughout the day to keep them warm, including heating pads on the tables in surgical prep and in surgery).
Recovery 1 area (“The Beach” 🏖) located just off the surgery room. Dogs on the floor, cats on the countertop.
The beach 🏝 from above. Veterinarians and technicians from the MSPCA in Massachusetts set up for the influx of patients. Having the small patients at an easy-to-reach standing height table makes caring for and monitoring them easier on the volunteers.
Owners helped in recovery, sitting with and holding their pets until ready for discharge
Once patients were warm and alert, they could leave the Recovery 1 beach and be reunited with their owners in Recovery 2. Veterinarians, technicians, and other volunteers watched over the roomful of “pet parents” waiting with their animals until the animals were recovered enough for discharge. An instructional video played, and owners also received instructions from and were able to ask questions of the vets and techs. Once their animals were recovered and ready to go home, they were discharged with post-operative instructions and emergency contact information, along with donated pet supplies and pet food.
Once the animals were gone, the work wasn’t done: data had to be entered from all the medical records into a centralized database that would allow researchers to study the users (clients and pets) and outcomes of the Spayathon clinics. Our site in Toa Baja had such limited indoor space that the data entry station was in a tent outdoors that was in theory air conditioned but was in actuality a bit of a sauna. Also, the data tent was the volunteer lounge and lunch tent, so data warriors also got to be lunch patrol (“only two plantains per person!”; “save the pitas and hummus for the vegans!”). Next round, we’re hoping for a space that puts these folks back inside the building in a climate controlled setting.
She’s not just wearing a harness, it’s a dress. How could I resist an embarrassed calico?
Meanwhile, I got to spend my time between many different areas of the clinic, but mostly between induction, prep, surgery, and recovery 1, trying to keep an eye on the big picture and flow, and pitching in where I could (and trying to remember to take pictures here and there). It was a great experience working with so many talented and dedicated people, and I’m looking forward to going back to the fourth round of Spayathon for Puerto Rico in May!